Are you about to open your first antique booth and stuck on how best to tag your items for sale? Or maybe you have been a booth owner for a while but want to see better sales and improve your branding?
I’m here to help! This post will break down all your options for how to tag items in your antique booth, as well as offer my personal tips for making the most of your price tags.

Why do Antique Booth Vendors Have to Tag Their Items?
If you’re new to the antique mall or flea market world, it’s important to understand that the collection of various spaces in the mall, or “booth,” are all run by different people. These are often referred to as vendors or booth owners.
Customers shop at these various booths but take their purchases to one central checkout at the front of the store. Here, they pay for all of the items they purchase together, rather than paying each booth owner individually.
This type of business makes it easy for booth owners to sell items to a willing customer base without having to physically be in the store all the time!
It’s a great option for busy moms, people looking for a side gig, or the retired who like the idea of additional income but not additional work commitments.
This setup up though means each individual vendor is responsible for adding the price tags to their specific items. The mall or flea market does not tag and price all of the available inventory, the booth owner does.
So as a booth owner, your price tags are one place where you can showcase your unique business brand to customers. They are also key to getting you the sale!
Let’s spend a little time learning the basic do’s and don’ts of tagging your inventory as well as how you can maximize this small area of your marketing and branding.
RELATED POST: Can You Make Money Selling at an Antique Mall?
What Kinds of Tags Should I Use to Price My Items?
Let’s start with one of the more basic questions. There are a lot of options out there for how to tag your inventory, and each has its own benefits and drawbacks.
I’ve seen new booth owners get so bogged down with “doing this perfectly” that it winds up taking way too much of their time as business owners.
Essentially, you want to be as professional as possible with your tags, but you also need to balance your expenses and time.

Essentials to Consider When Tagging Items:
- Tags should be easy to find on all items and handwriting should be neat and readable
- The larger the item, the larger the tag should be. Smaller items should have smaller tags.
- Tags need to be secure. Tags that fall off or can be easily removed and switched by buyers result in lost sales and/or theft.
One of the most frustrating things for a buyer is having difficulty locating a price tag on an item, or if they find one, not being able to read what it says!
Your tags need to not only work for you, but also for your customer. Make it easy for people to see the price and your sales will do better.
Options for Tagging Booth Inventory
Let’s walk through some of your options for what tags to use and discuss the pros and cons of each.
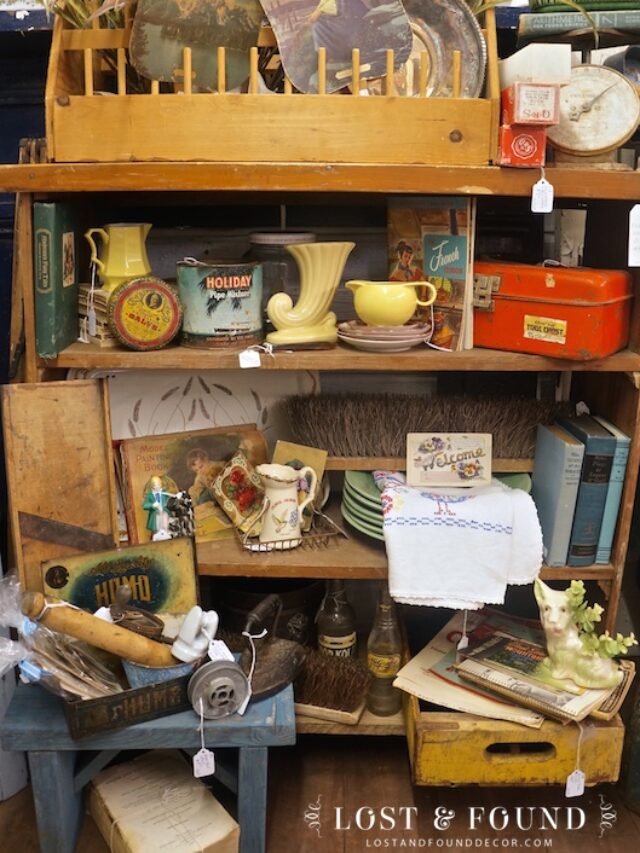
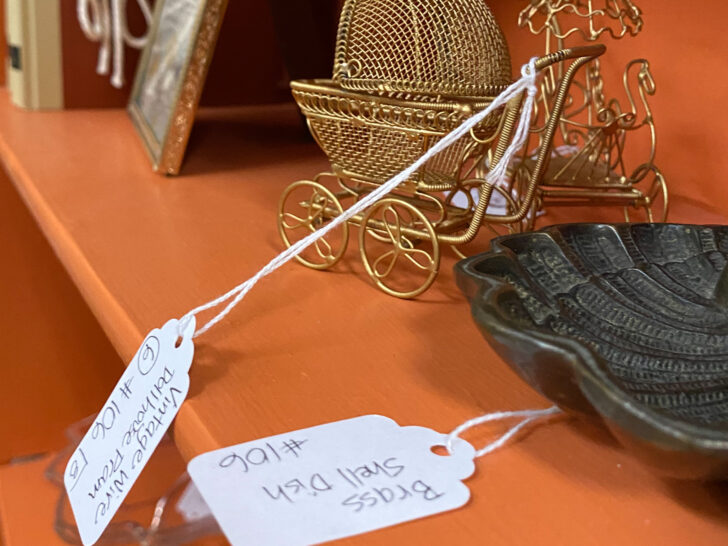
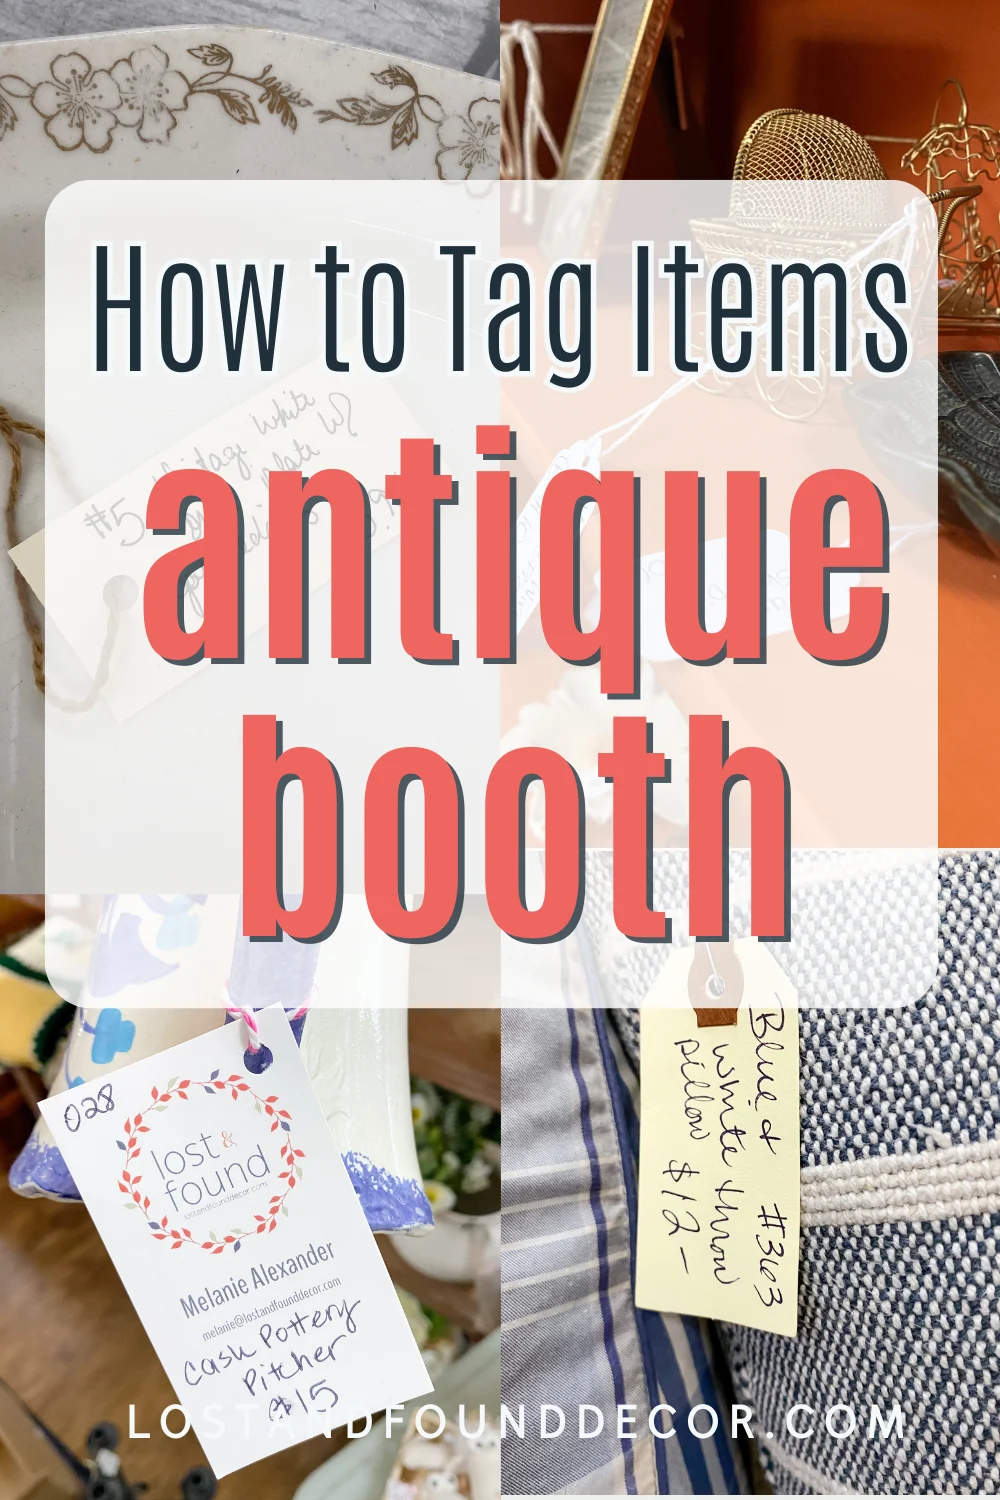
White String Tags: These are affordable and a quick way to tag a lot of items. They are a staple of antique booths everywhere, and I’ve used them myself. You can try customizing them with a stamp on one side. The main drawback is that too many dangling around can make a booth space look messy.

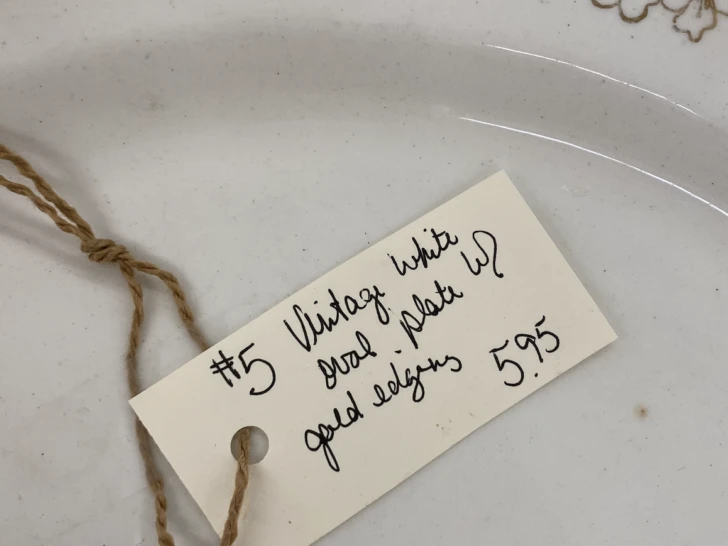
Craft Paper Luggage Tags: These thicker cardstock tags look more upscale than your basic white string tag. They are good for larger items, like artwork and furniture. The main drawback is price–if you have a large booth space with a lot of inventory, the cost of these can really add up over time.
One way to get more bang for your buck is to cut the tags in half and use a hole punch and twine to make a second tag out of the bottom half.

Scrapbook Paper Tags: This is a do-it-yourself option if you want something nicer than a white string tag, but more affordable than a luggage tag. A visit to your local craft store will provide you with endless options for scrapbook paper you can cut into tag sizes.
I would recommend using cardstock weight paper so your tags can be durable. The main drawback with this option is the time it takes to cut up all the tags. Using a paper cutter can make quicker work than using scissors and also gives you cleaner lines.
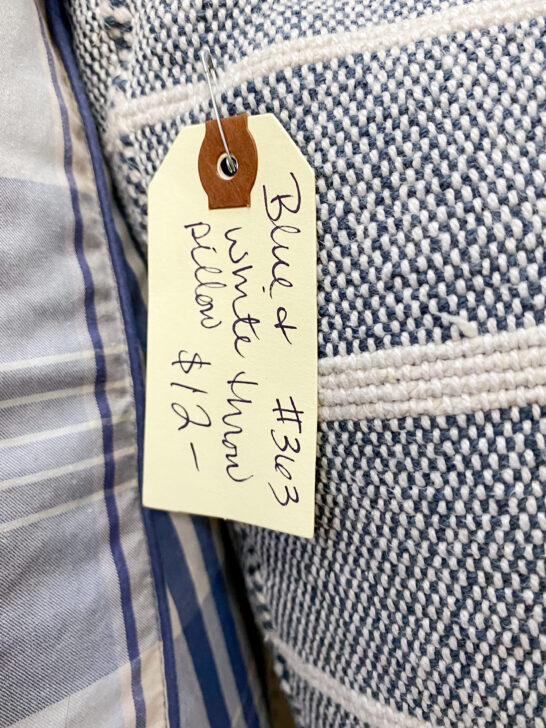
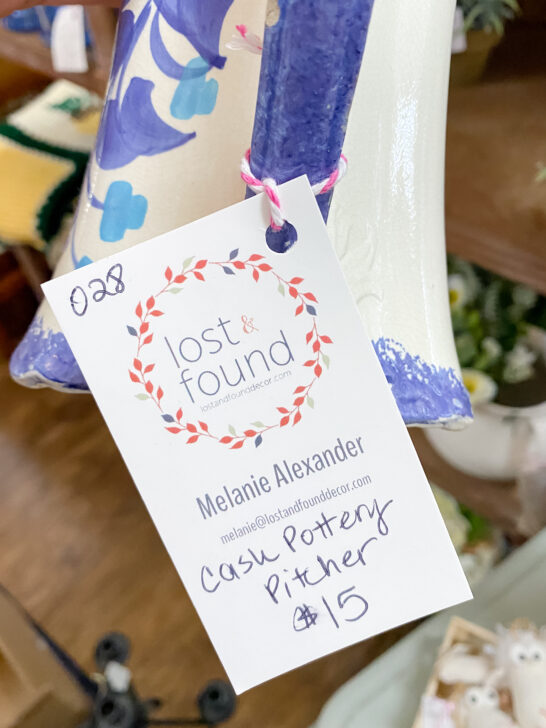
Printed Tags or Business Cards: If you’re at a place in your business where you can invest a little more money, using customized tags can be a great way to showcase your brand to customers. I’ve also seen many vendors use business cards as tags over the years.
This works particularly well if your mall leaves tags on items for customers- all your business branding and contact info travels home with them! Of course, the main drawback of this option is the price. I have yet to find an affordable custom printing option; when I do, I’ll pass along the info!
What Information to Include on Your Price Tag
- Vendor Number
- Item Number
- Detailed Description
- Price
- Any good history attached
When you become a vendor, you will be assigned a vendor number. The mall tracks your specific sales using this number, so it’s key to have it on every single tag.
I also recommend including item numbers on your tags for your personal inventory tracking. They can be numbers you invent–just start with 001 and go up from there!
I track my booth inventory using a blank notebook. For each piece of inventory, I list an item number, description, what I paid for it, what I am selling it for, and a place to mark when it sells.
Item numbers help you distinguish between similar items. For example, you may have many vintage platters, so how do you know which one sold? Here’s where an item number comes is handy.
You also want to be descriptive on your tags. Back to the platter example, instead of writing “vintage platter,” try “vintage platter with pink flowers and gold trim.”

Sadly, not all customers are honest. 🙁 Some will swap tags to get a cheaper price on an item, so a $25 vintage platter becomes a $10 vintage platter if they swap the tags.
If your tags are descriptive, that will help discourage tag swapping.
Also, if you’re selling an item with a particularly interesting story, include it on the tag! I recently sold a desk from an old high school shop class, and I included that info on the tag. Telling a good (true!) story is a great way to boost your sales.
Lastly your item price should be included! And again, make sure it’s legible and easy to read.

Things to Avoid When Tagging Your Booth Inventory
- Illegible handwriting
- Tags that will easily fall off–make sure they are secure!
- Stickers or tags taped onto delicate items.
- Tags that are on the backside of objects or other places where it’s hard for customers to see the price.
- Marked through prices
Sometimes in a rush, our tags come out a little messy and hard to read . . . the clearer your tags are though, the easier you make shopping for your customer.
Also over time, some writing may fade. Periodically check your tags to make sure your writing is still legible, especially for any items in a window or direct sunlight.
I try avoid using scotch tape to attach my tags, mostly because over time the tape wears down and tags fall off. Tying on a tag is the best way to make sure it’s secure.
Also, taping tags to delicate items is a no-no. I shudder at all the old books I’ve found with a taped on tag . . . when the tag is removed at the counter, the book cover is usually damaged!
It’s best to avoid tape or stickers on all paper and cardboard items (old books, games, etc.), items with loose or old paint, furniture, and fabric. Instead, tie on your tags with twine or use safety pins to attach tags to fabric.

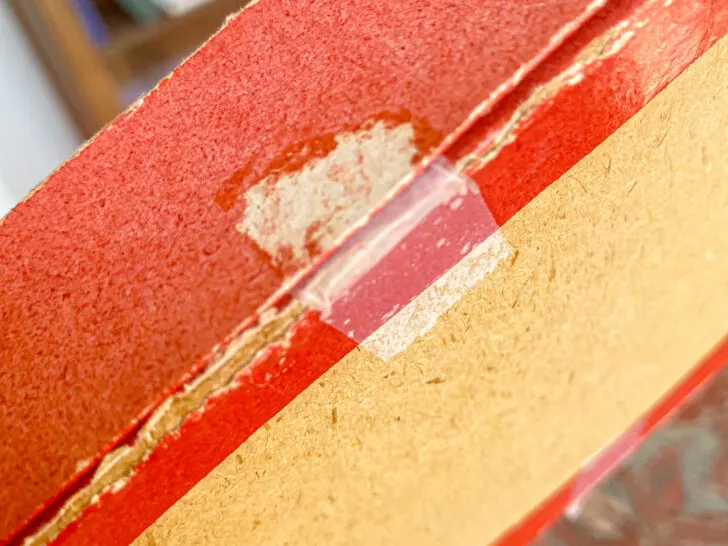
An antique board game is damaged by tape– so sad!
From time to time, you may find that you have to change a tag by marking down a price or making another edit.
It’s best to make either a new tag with your new info, or attach a second “sale” tag with the new price (try stapling it onto the existing tag).
ase
This not only makes your tags look more professional but also prevents dishonest customers from marking through prices and adding lower ones themselves. I hate to say that it happens, but it does.
Final Thoughts on Price Tags for your Antique Booth
This is an area where you can get creative and really showcase the personal brand of your business!
But in pursuit of creativity, make sure you are also still being efficient with your time. You will be tagging a lot of inventory over the course of your antique booth journey, so make sure you can keep up with the method you choose and don’t make it too complicated.
Clear tags that are easy to find for customers win every time. If a tag is missing or too hard to read, the average customer will walk on by.
If you’re a new booth owner, I hope this has helped you get together a plan for tagging your inventory.
And if you’ve had a booth for awhile but feel like this is an area where you can improve, I hope I’ve offered some ideas for how you can up your game.
Thanks for joining me today!

You may enjoy these other antique booth posts!
4 Ways to Jump Start Your Antique Booth Sales
5 Ways to Make More Money This Year from Your Antique Booth
Ideas for What to Sell Every Month in your Antique Booth
It All Started with the Antique Booth
Download my FREE Guide for Getting Started Purchasing Wholesale!

If you’re a booth owner and you want to start supplementing your found items with new decor you purchase wholesale, this guide is for you!
I’m sharing everything you need to know to make your first wholesale order, as well as mistakes to avoid and my favorite wholesale home decor companies.
DOWNLOAD IT HERE >>>>>>Wholesale Guide for Booth Owners
Tammie
Tuesday 18th of November 2025
We sometimes have a lot of misspelled words at checkout so I love the idea of inventory numbers. Sometimes it’s so bad I have no clue what the item was. I know at times they are very busy and in a hurry so I understand. I’m just wondering if the antique store I’m at would actually include the inventory number at checkout? I guess it wouldn’t hurt to ask? Thanks for all the good information!
Stephanie
Thursday 6th of March 2025
What do you suggest if you can’t use a tag, like pricing a plate or something that doesn’t have a way to hang a tag? I’ve been forever trying to figure out a way. I too don’t like using tape. Any ideas would be so appreciated. Thank you.
Melanie Alexander
Tuesday 6th of May 2025
I think tape or a sticker tag is really your only option here. You could look for easy-peel tags, ones that come right off and don't cause damage.
Lee Agnew
Monday 9th of December 2024
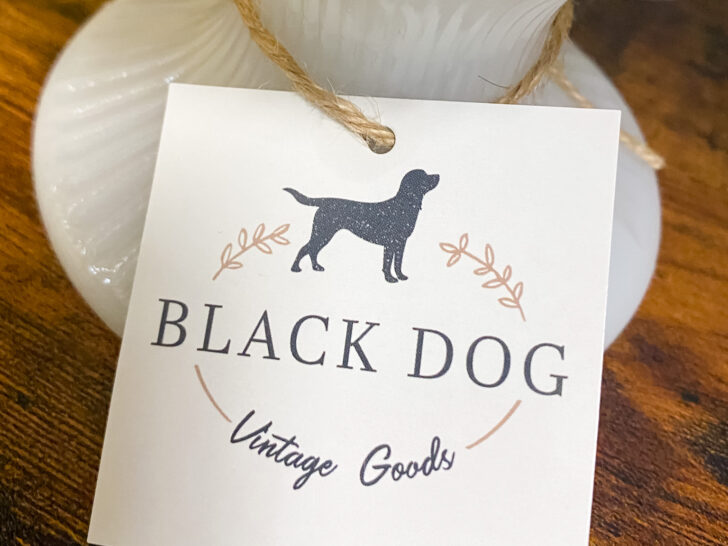
Great article! Over the years I think I've used all the methods you mentioned. Thanks for featuring my tag! Black Dog Vintage Goods. :)
Melanie Alexander
Monday 16th of December 2024
Yes! I was so impressed with it! Thanks for stopping by :)