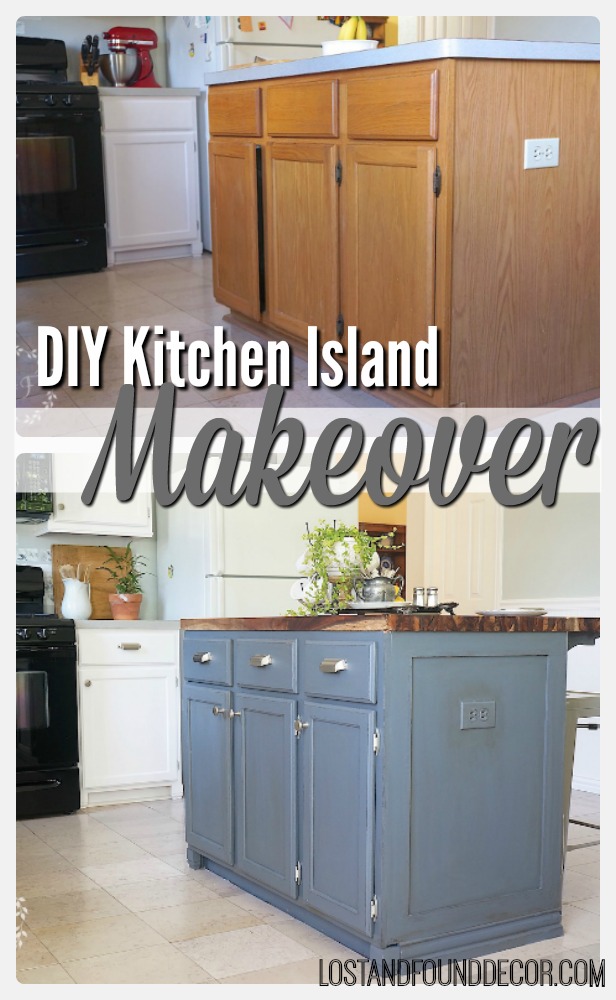
In case you need a refresher, here is where my kitchen island started:
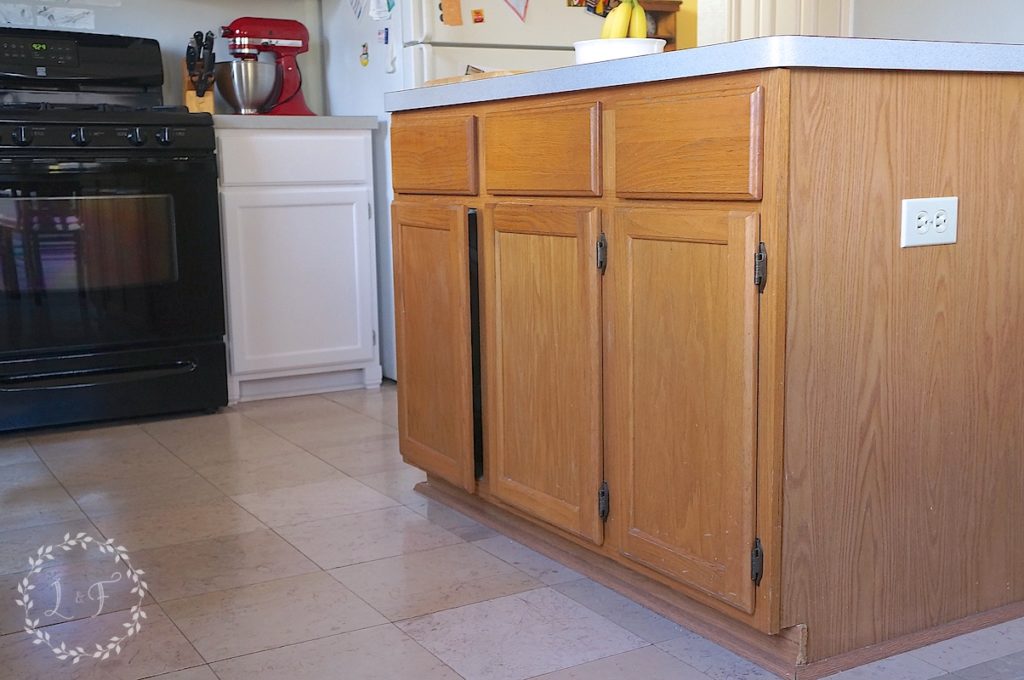
 Yep, it’s your basic, builder-grade island with a laminate countertop. Nothing particularly special about it, except the fact that the builder was nice enough to wire in two electrical outlets on each side.
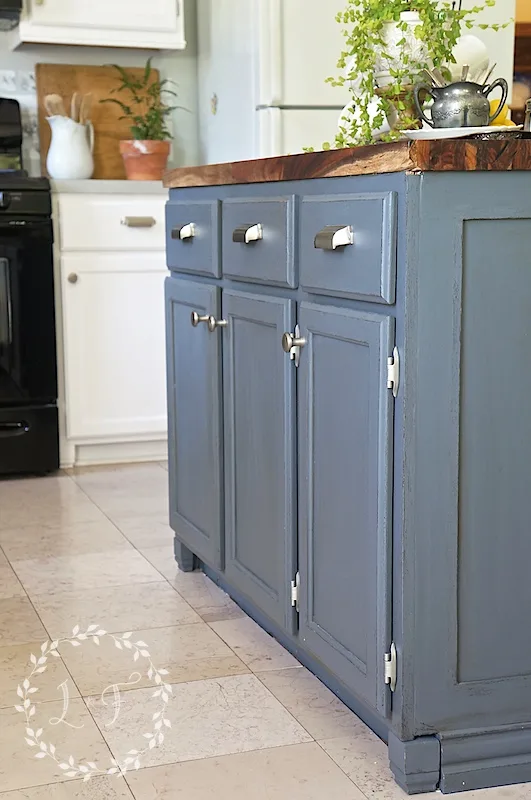
Giving this kitchen island a whole new look has been a major part of my DIY kitchen renovation project.
I’ve already finished painting most of the rest of my cabinetry white, so the plan for this island is to expand the countertop and finish it out with a dark, antiqued paint finish to contrast the white.
Last week I walked you all though the process of installing the custom trim and new butcher-block countertop.

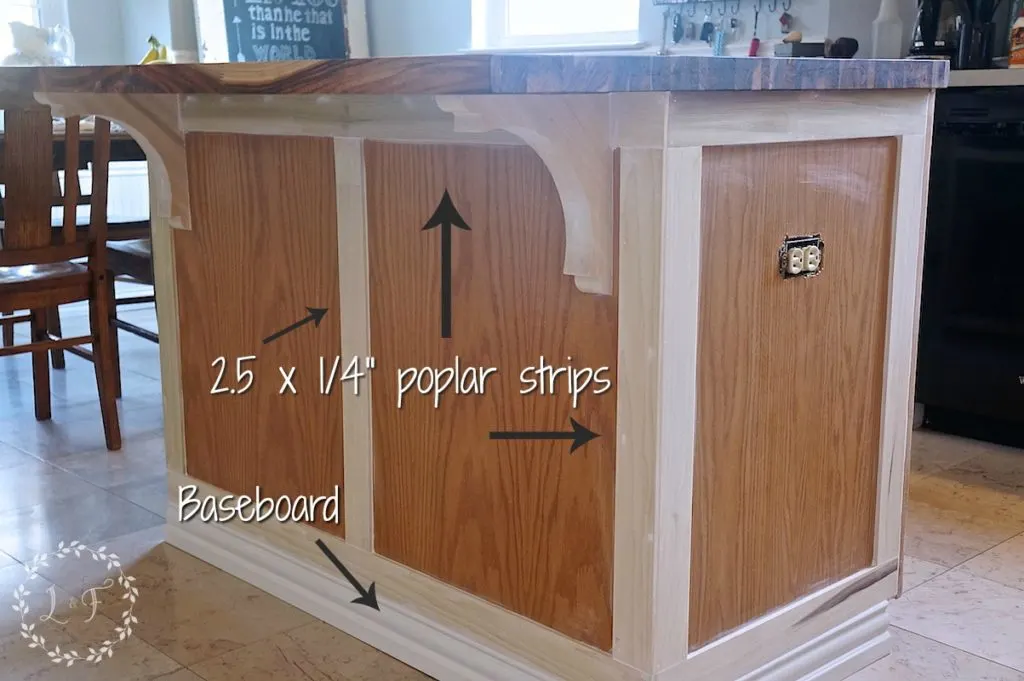
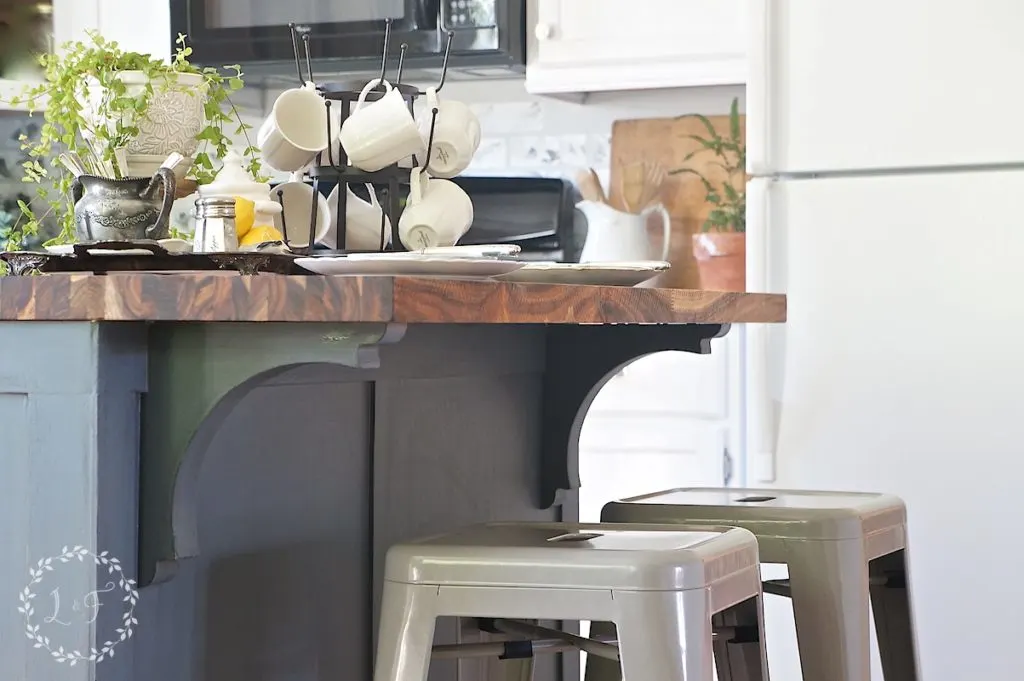
I loooove the expanded countertop and extra seating we now have (so do my kiddos!). If you have extra space around your island, why not make use of it?
The butcher block is beautiful too and adds a real rustic, warmth to my space.
So the next step in the makeover process is to paint the island.
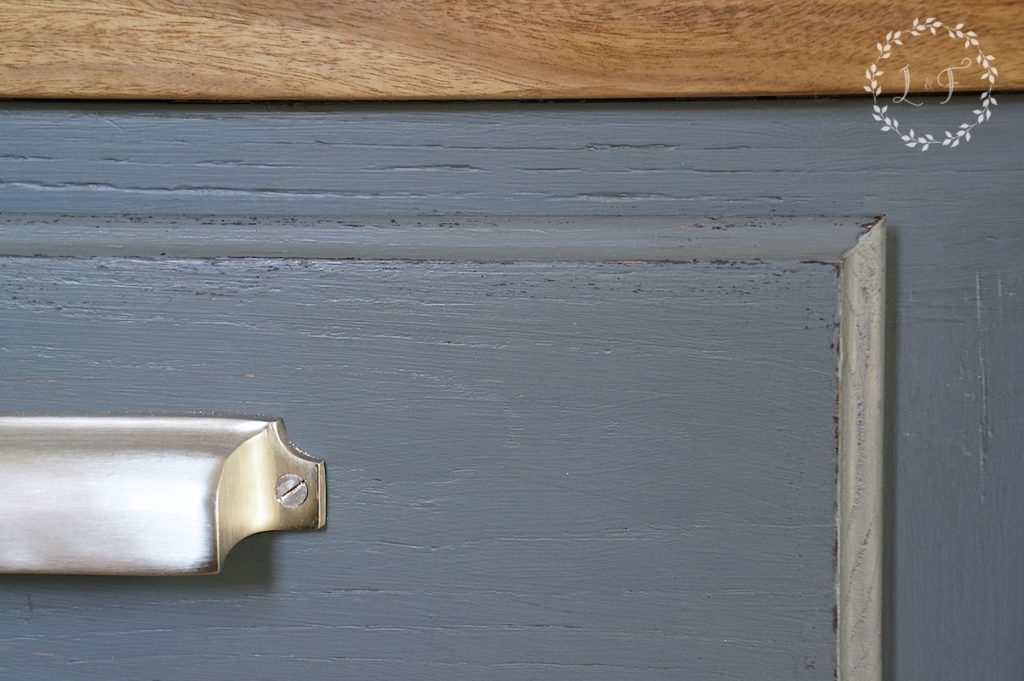
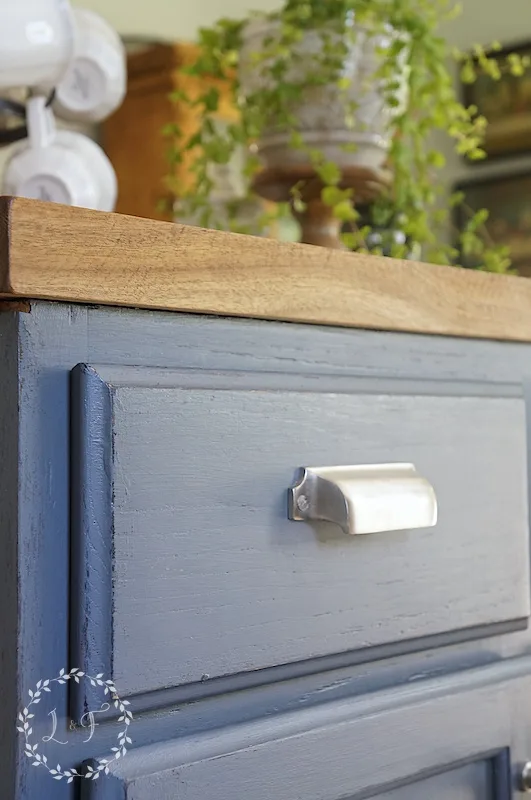
My plan was to use one of my favorite Fusion Mineral Paint colors, Soapstone, and to distress the edges of the cabinetry to give it an aged look.
I’m not going to walk through all of the prep steps I took, but if you want to read about how I prep to paint cabinets with Fusion Mineral Paint, you can check out this post here.
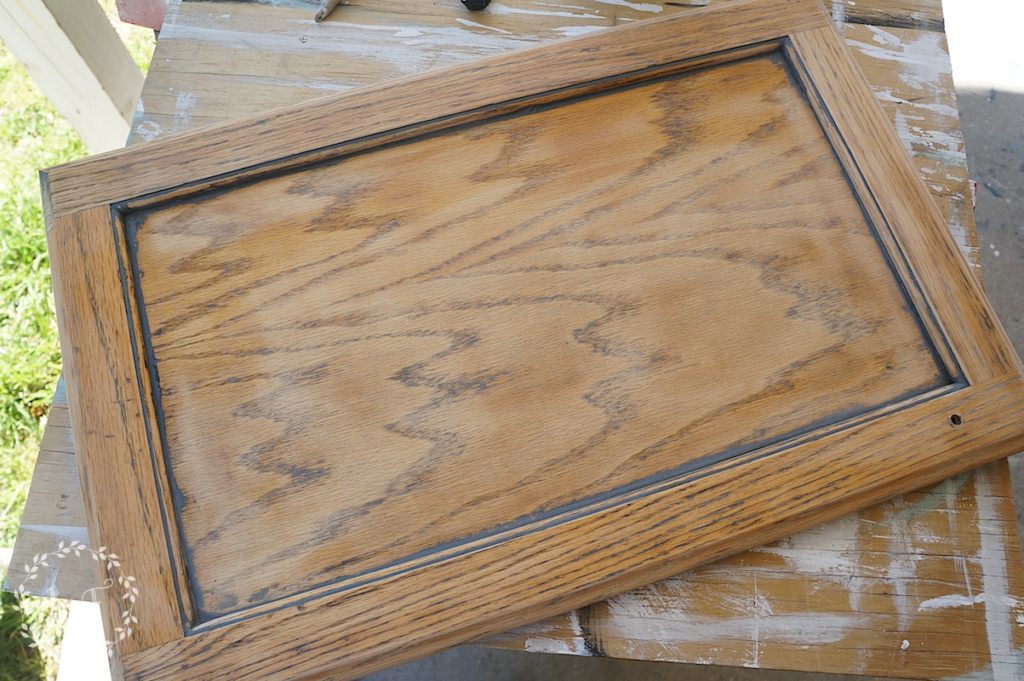
 So here is the cabinet door to start . . . Well, sort of.
I actually had already painted this door, but had to do some touch-up work and was having trouble getting the finish to match.
I went ahead and sanded it back down to start from scratch, thinking it would be good to walk you all through the paint process anyway 🙂
So ignore the little bit of paint stuck in the corners!
Step 1) Paint A Dark Chocolate Undercoat
I knew I wanted to distress the Soapstone finish a little, but I didn’t want the honey oak color to be what showed through.
To solve that problem, I painted on a base coat of Fusion Chocolate so the color showing through the distressing would be a nice, deep brown.

Step 2) Apply Wax Block to the Edges
After the Chocolate was dry, I rubbed the Fusion Wax Block Fusion Wax Block all along the edges of the door.
The wax functions as a resist for the top layer of paint–when I paint over the wax with the Soapstone, the wax will keep the paint from sticking in those areas and so it will sand off easily.

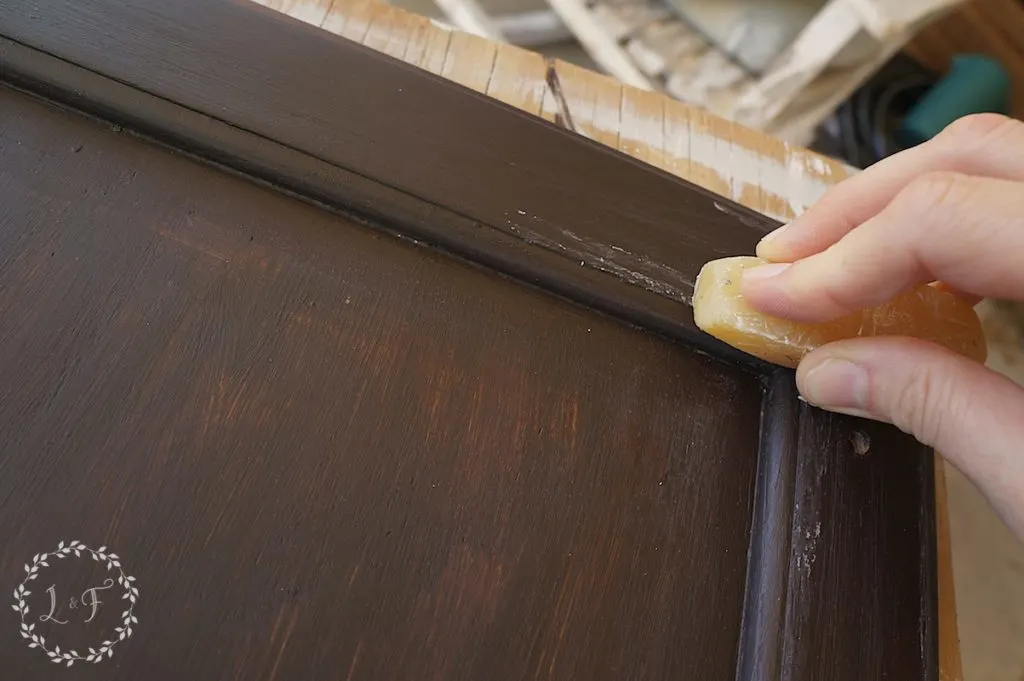 This is a great technique to use when you want to sand through a top color, but not a base color.
The wax will allow the top color to sand off easily and will protect the base color from your sandpaper. Make sense?
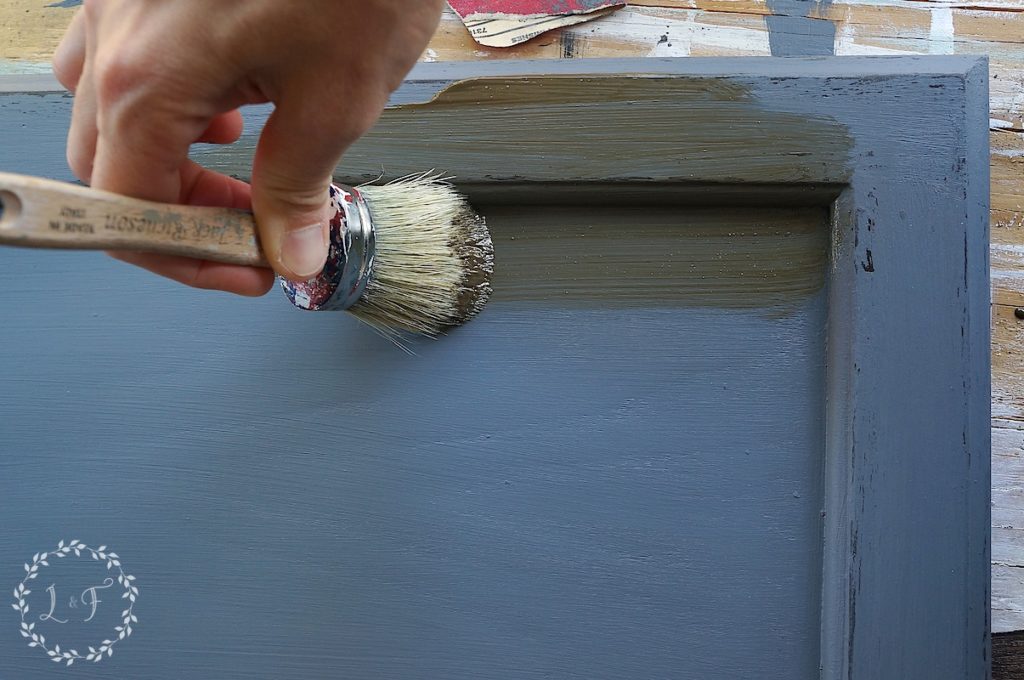
Step 3) Paint the Soapstone Over the Dark Chocolate
Next goes on one coat of the Soapstone . . . I call this the Miracle Color!
The coverage is absolutely amazing!
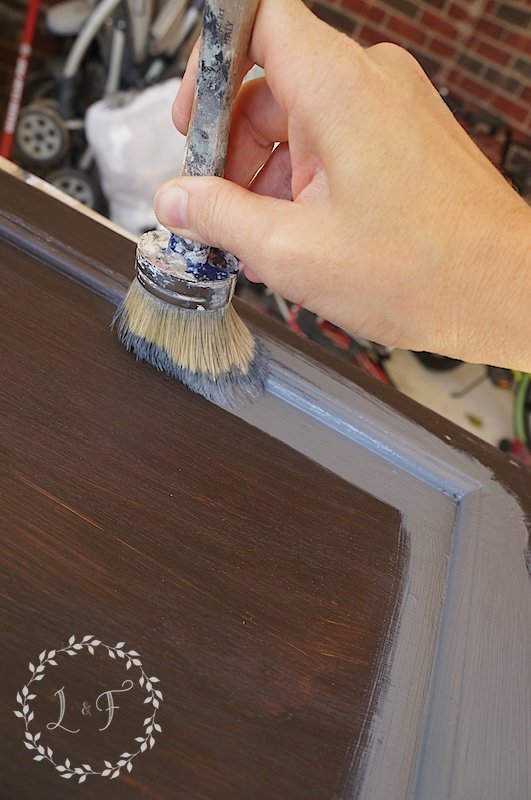
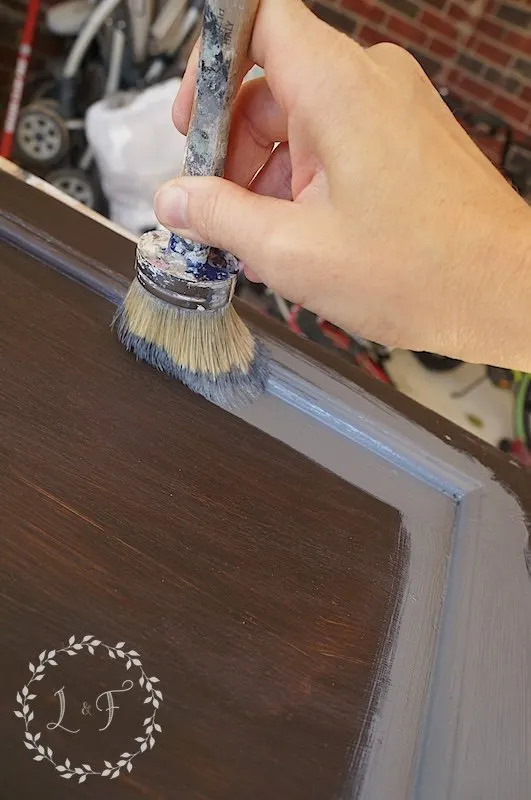 And yes, I like painting my cabinets (when I use Fusion) with my round, Fusion natural-bristle brush (this brush no longer available, but this brush is comparable and will work great!)
I find that the brush keeps the paint nice and smooth and works really well to push the paint down into the deep grain of the oak.
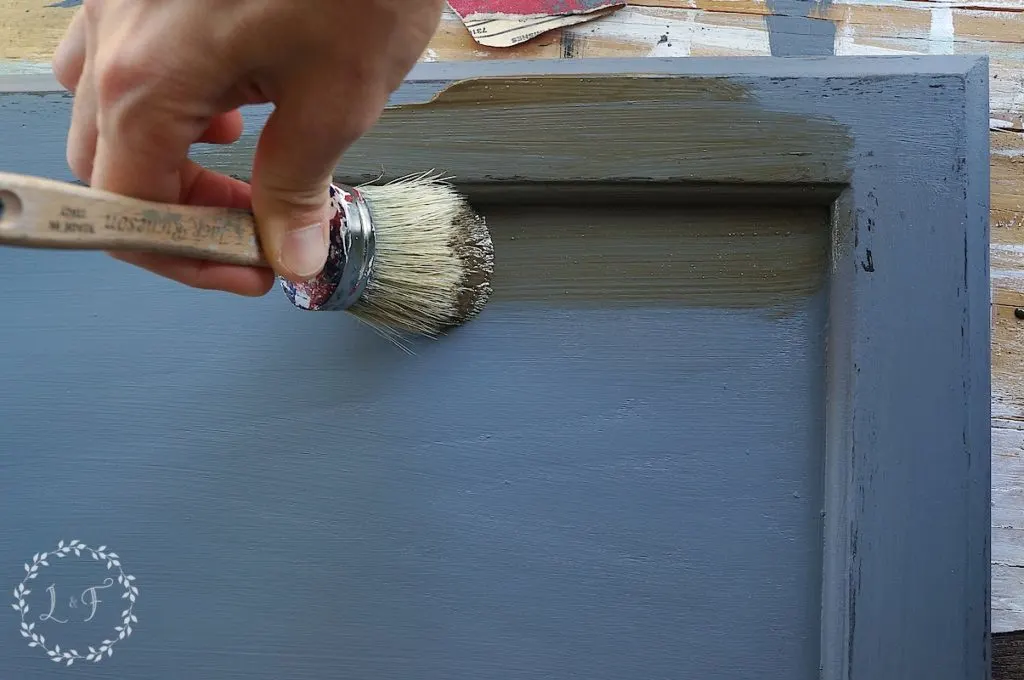
Step 4) Lightly Sand the Cabinet Edges
Once the Soapstone dried, I took some 220 grit sandpaper and sanded along the edges of the cabinet, where I had rubbed the wax.
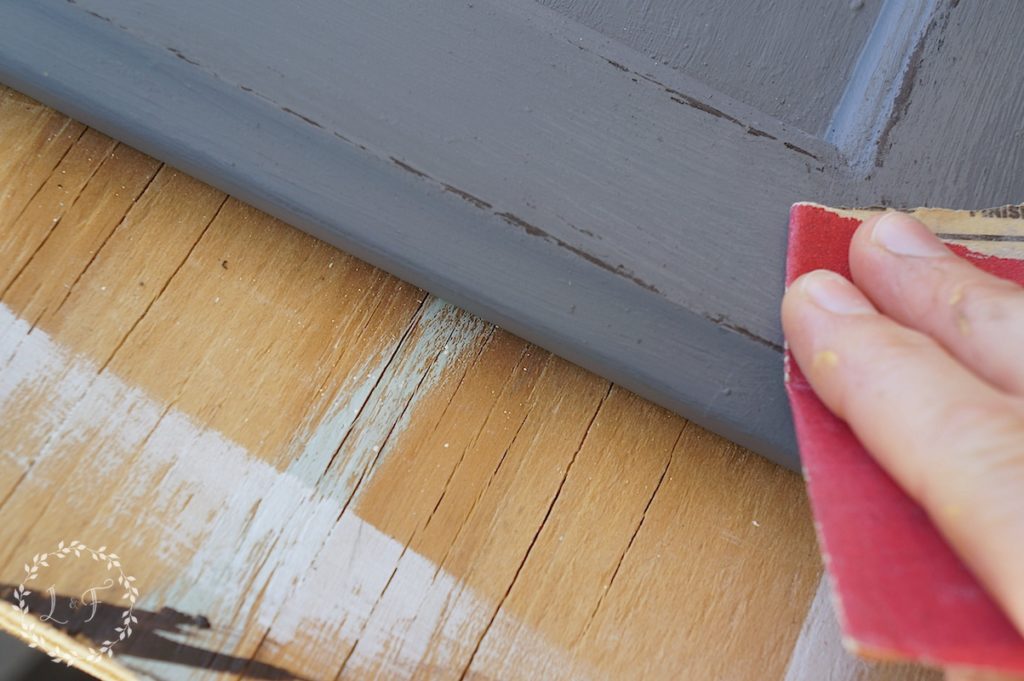
 Worked like a charm!
Now the pretty, dark Chocolate shows underneath my finish, not the honey oak.
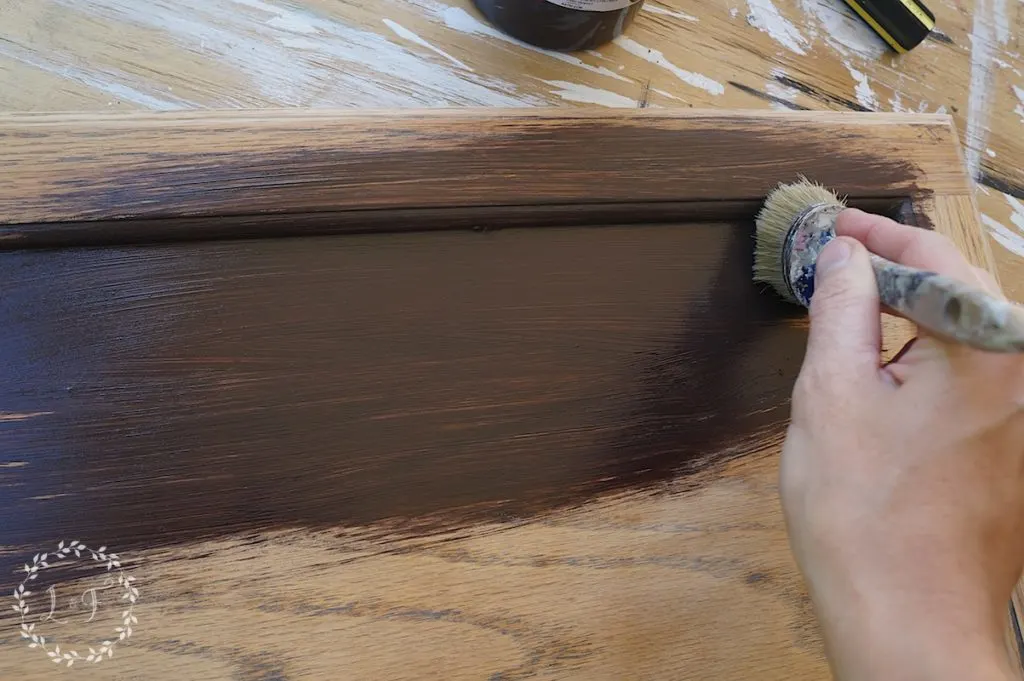
Step 5) Apply an Antique Glaze
I wanted to warm up the Soapstone just a little bit more, to help it tie in with the butcher-block countertop.
Adding on some of the Fusion Antique Glaze was the simplest way to get that look.
It’s best to let your base color paint dry out well before you apply the glaze, so I recommend letting your paint dry overnight first.
This product is sooooo easy to work with, a million and a half times easier than working with a dark wax.
Just brush on the glaze . . .
then wipe off the excess with a rag.

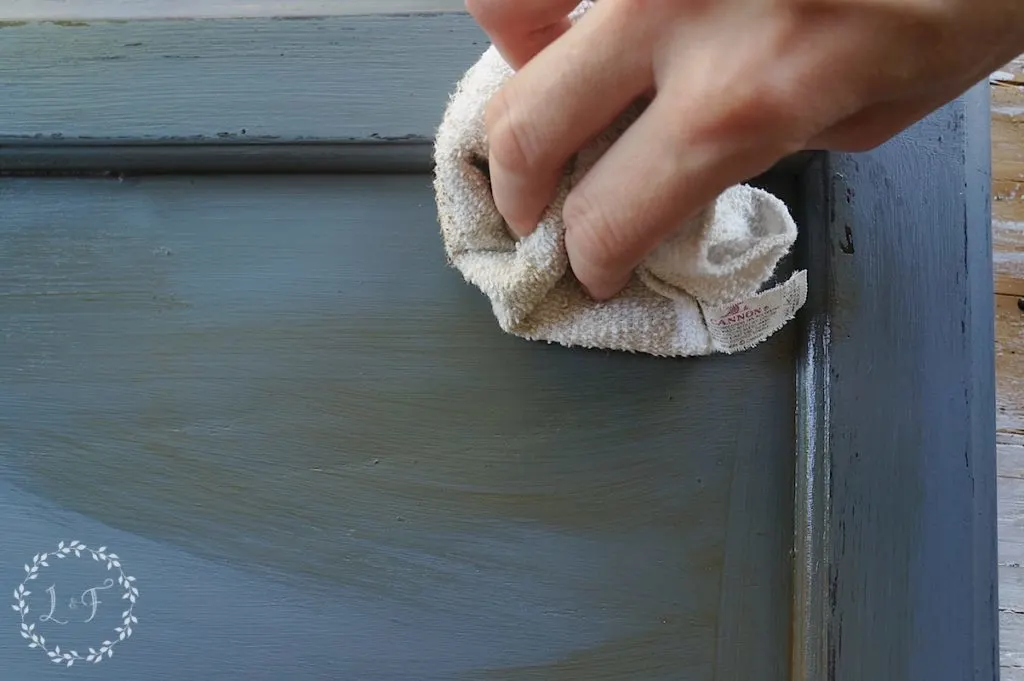 If you want it darker, you can always wait a bit to let the first coat of glaze dry and apply a second coat.
So that’s the painting steps! Now, put it all together, and here is my new kitchen island:
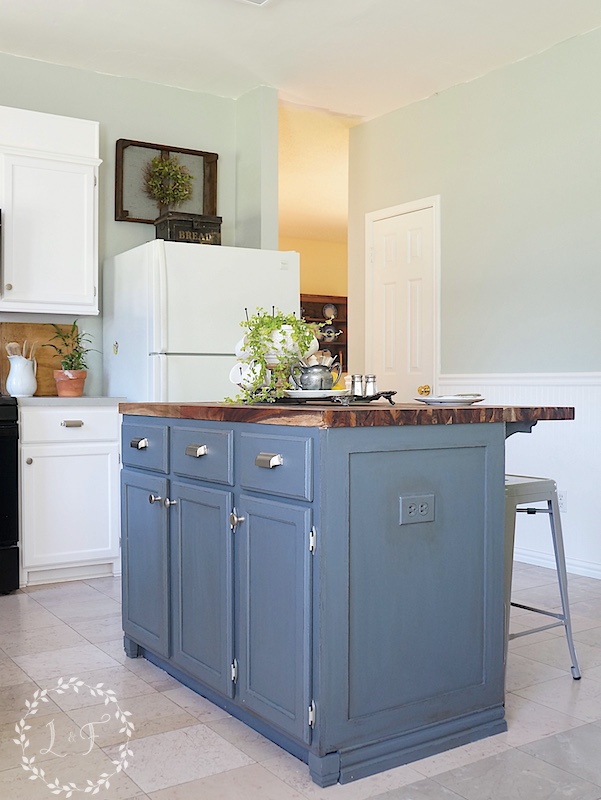
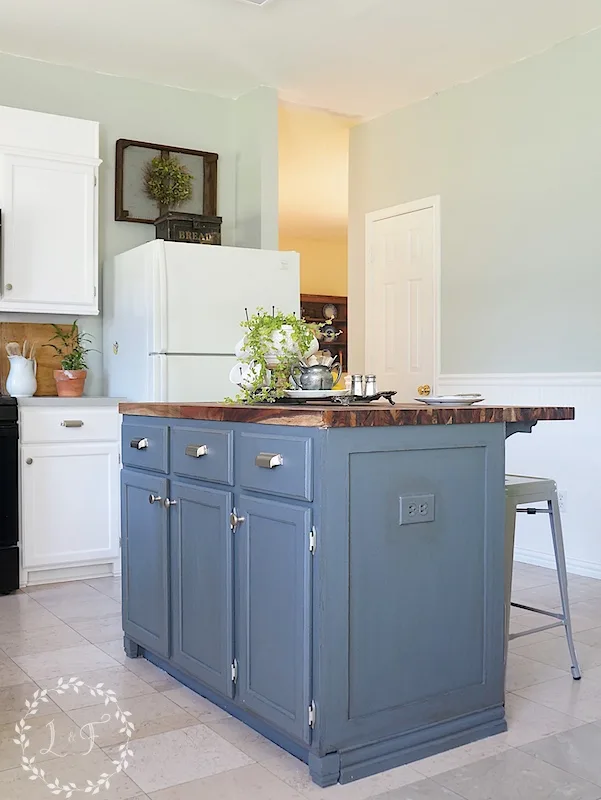
What do you think?
I really love it. Honesty, it makes me feel kinda giddy to look at these pictures, like, “Hey, Look! I did that!”
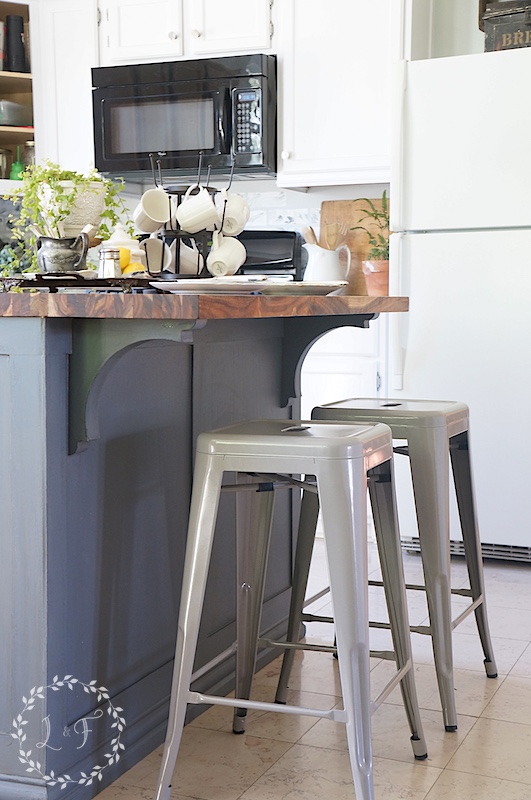

The barstools were a fantastic find from Kirklands, and add a little rustic-industrial touch.
Plus, they are very kid-friendly.
I also like the distressed finish of the island against the smooth, sleek finish of my white cabinets.
And the silver nickel bin pulls add that little farmhouse touch.


If you’re wondering how the Fusion paint is holding up, I will tell you it’s been great!
I did not apply any topcoat because you don’t need one to seal Fusion.
On its own, it cures up to provide a waterproof and stainproof finish.
My boys sit on the barstools and kick the back side of the island with their little feet, and the scuffs from their shoes wipe right off.


Finishing this major project has helped motivate me to finish up the rest of my kitchen!
I promise you, if I can pull off this makeover, so can you.
Don’t settle for your builder-grade kitchen island any longer!
Make it what you want with a little time and TLC 🙂

Thanks so much for stopping in today!
And as always, you can shop for all of these Fusion products at my 2 Dallas area local shops or with me in my fully stocked online shop!


Please share this makeover if you have been inspired by it!
- Want to see where my kitchen started? Click here.
- Want to see how I prep cabinets before I paint with Fusion Mineral Paint? Click here.
- Want to see how I installed the custom trim on this island? Click here.


50+ Dreamiest Farmhouse Kitchen Decor And Design Ideas To Fuel Your Remodel – Decor Frost
Wednesday 24th of July 2024
[…] Photo Credit: lostandfounddecor […]
50+ Best Farmhouse Kitchen Decor and Design Ideas for 2024
Thursday 29th of February 2024
[…] Source: lostandfounddecor.com […]
DIY High End Patterned Tile Backsplash Look with Peel & Stick Tile
Friday 7th of October 2016
[…] So from that, with some DIY trim work and painting we made our way to white cabinets with a DIY-upgraded gray island: […]
DIY High End Patterned Tile Backsplash Look with Peel & Stick Tile
Friday 7th of October 2016
[…] So from that, with some DIY trim work and painting we made our way to white cabinets with a DIY-upgraded gray island: […]
Chalk Paint vs Fusion Mineral Paint | What's the Difference? | Lost & Found
Monday 8th of August 2016
[…] How I used Fusion to Makeover my Kitchen Island […]