This post has been a loooong time in coming!
I have been working on making over my kitchen, little by little, since December of 2014.
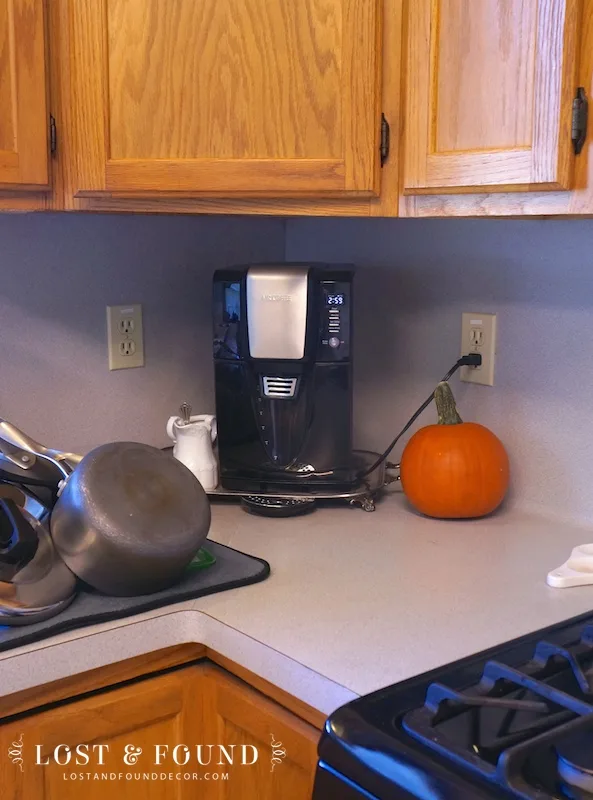
This isn’t a great “before” picture, but imagine the rest of the kitchen looking like this little corner, with blue laminate countertops and backsplash, along with honey-oak cabinets:

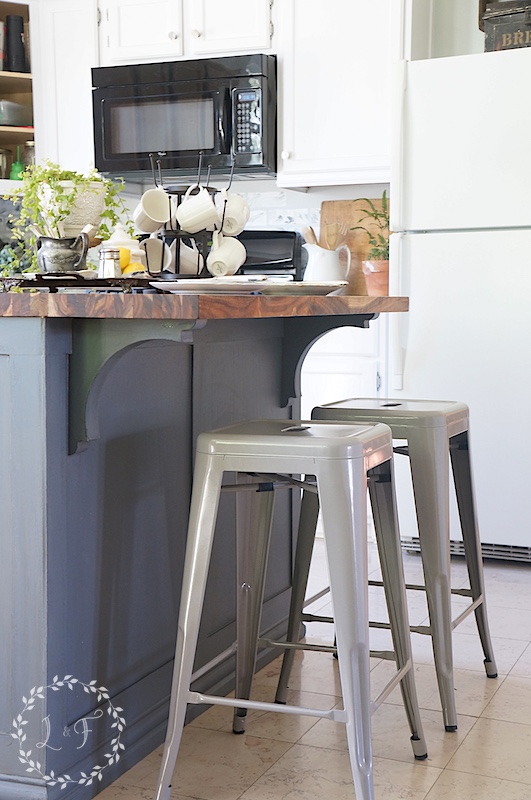
So from that, with some DIY trim work and painting we made our way to white cabinets with a DIY-upgraded gray island:

The next job to tackle was dealing with my backsplash.
My countertops are a light blue/gray laminate and the laminate sheet runs straight up the wall for the backsplash.
Since we didn’t have room in our budget to replace the countertops, we were going to have to work with the sheet of laminate already installed and find some way to cover it up–without spending a ton of money, in case the day does come where we do replace the countertops and have to rip all of that laminate out.
I went through multiple plans for this backsplash, which you can read all about here.
For various reasons, I wasn’t happy with the look I was getting, so in April I settled on my new, and final backsplash plan.
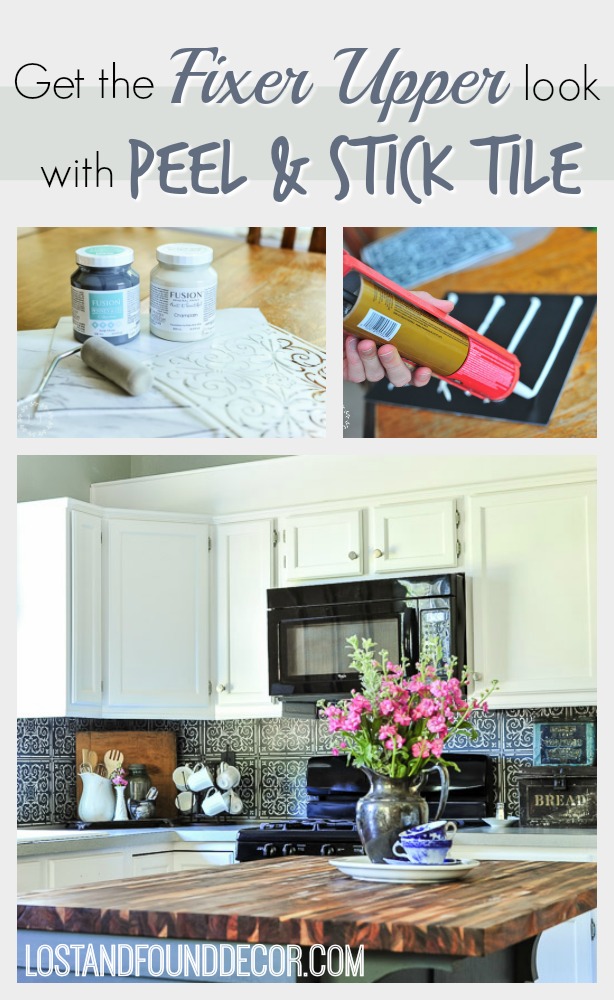
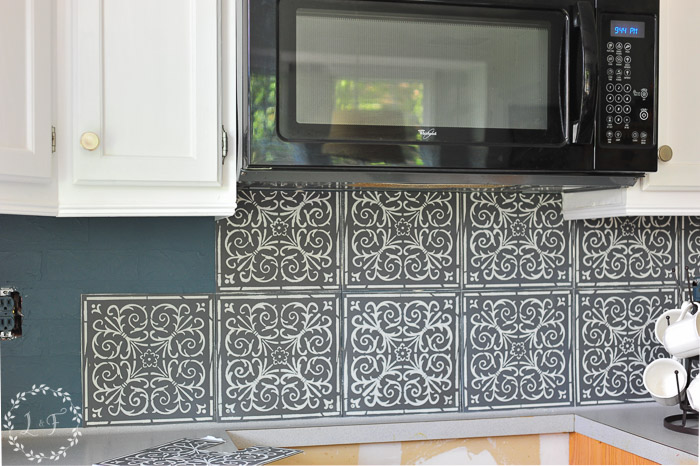
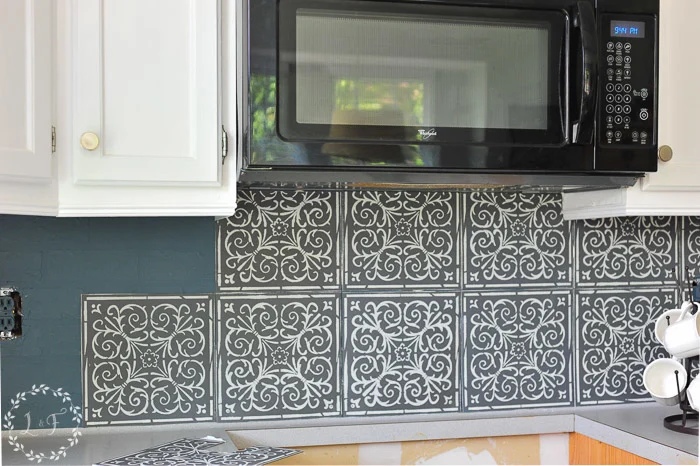
I love this patterned tile look that first showed up in Season 3 of HGTV’s Fixer Upper, and now is popping up all over design and home decor magazines.
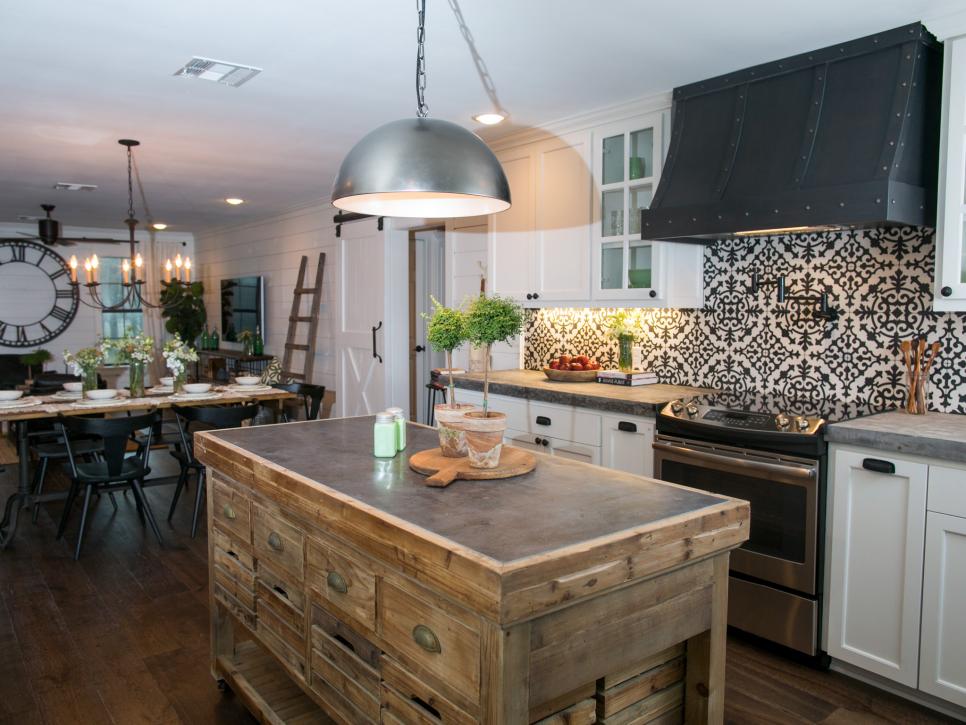
via HGTV
With over 20 square feet of backsplash to cover though, these types of tiles were more than what I wanted to spend on a project that may be temporary.
With the help of fellow blogger Linda at Q is for Quandie, I came up with plan to recreate the patterned tile look using inexpensive peel & stick tile, stenciled with Fusion Mineral Paint and a stencil from their Tin Tile line.
The whole process took quite a bit of trial and error, but in the end, I am so happy with the budget-friendly but high-end look we were able to create in our kitchen.
Today is the day when I finally get to share with you how to do this project on your own!

This post contains links to affiliate sites outside of LostandFoundDecor.com. Links are provided for your convenience and will not result in your email or contact information being shared with other sites.
Stenciled Tile Backsplash Project Supplies and How-To
Supplies needed:
- Peel and Stick tile with little to no texture (measure your square foot needed to determine how many)
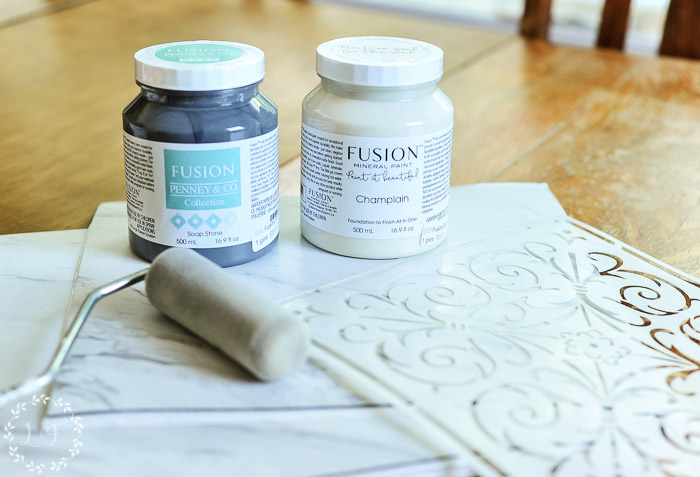
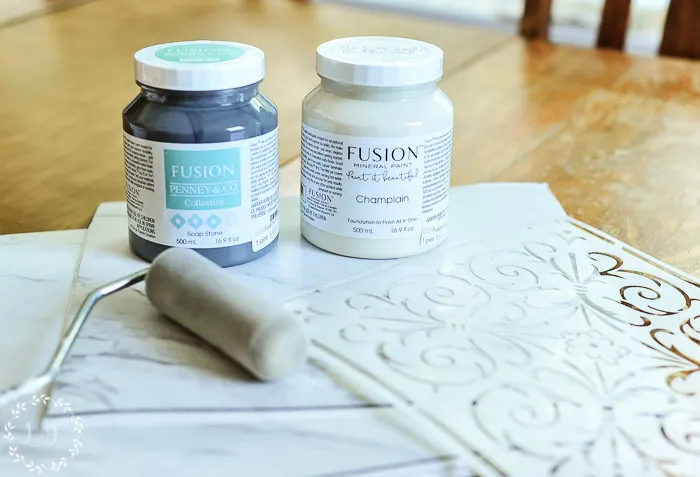
- 1-2 cans Liquid Nails (depending on kitchen size)
- Fusion Mineral Paint Ultra Grip
- Fusion Mineral Paint in choice of colors (I used 1 pint Soapstone and 1 pint Champlain)
- Fusion Mineral Paint clear Tough Coat
- Stencil from Fusion’s Tin Tile Collection (I chose the Willowbank pattern)
- Small Foam Roller
- Small container Pre-Mixed Grout (I used this product from Home Depot) *optional
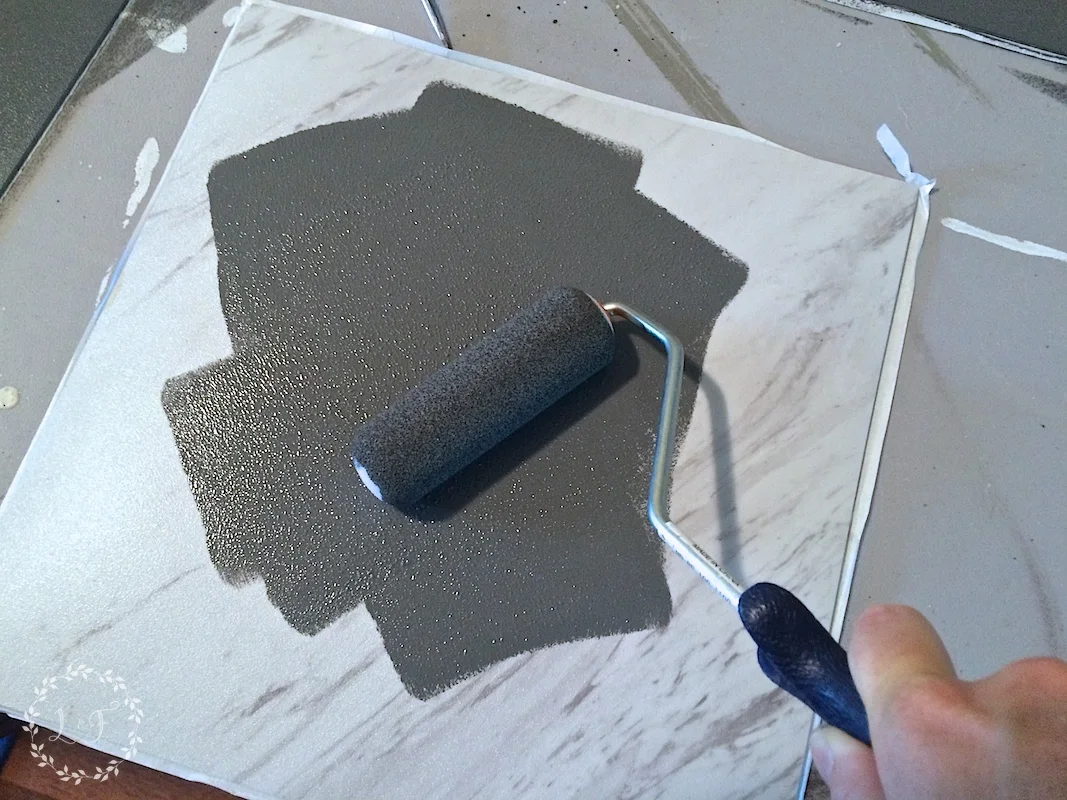
Step 1:
Paint Ultra Grip onto tiles and allow to set overnight.

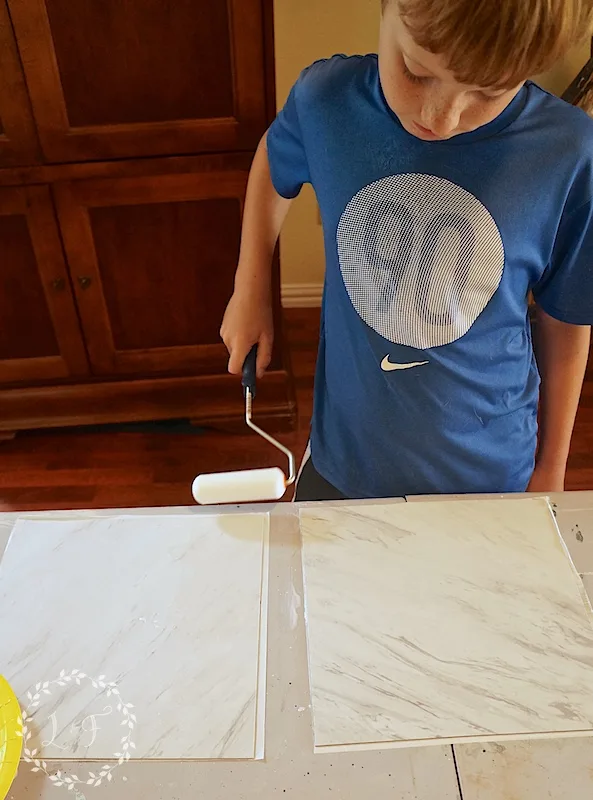
I tried out not applying a base coat of Ultra Grip as well, and my paint stuck pretty well. But since a kitchen backsplash is such a high-traffic area, I decided better to be safe than sorry–I wanted these tiles to have the best durability possible.
The Ultra Grip will provide that extra adhesion for the paint and long-term, create more durability.
Step 2:
Paint on your base coat of color (I chose Soapstone) using a foam roller.
1-2 coats will be needed depending on color choice, and it’s best to wait the full recommended drying time in between coats to ensure maximum paint adhesion.

Step 3:
Trim thick edge off of stencil and trim each tile to match the size.
I apologize, I don’t have a photo of this part . . . but basically the stencil came with a 1 in. border edge. To best recreate the patterned tile look, I wanted the stencil pattern to have only a 1/4 inch edge, so I measured and cut off the excess.
The peel and stick tiles were pre-sized 12 in. x 12 in. and needed to be cut down to fit the stencil.
To cut the tiles, you simply score them 2-3 times with a box cutter, then bend at the seam. The tile piece will break right off, so easy and no messy tile cutter needed!
Step 4:
Apply your stencil pattern to each tile using your second color (Champlain in my case) and a foam roller.

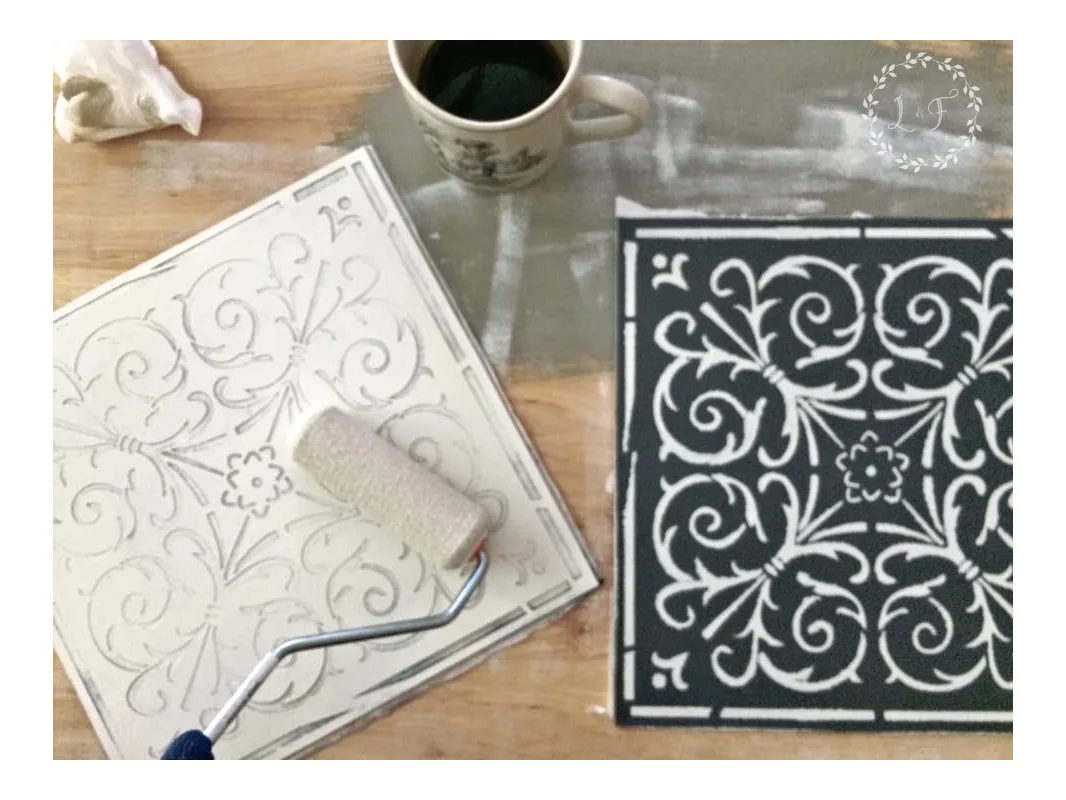
Sorry for the grainy photo . . . this was one I snapped with my phone for Instagram while on a stenciling binge on Saturday afternoon.
To get the best results, you want to use roll on the paint very lightly.
I also washed the excess paint off of the stencil in between in each use, then set it in the sun for 2-3 minutes so it would air dry. You don’t want any paint that seeped through your stencil being transferred onto your next tile, so a quick rinse off in between takes care of that problem.
This was honestly the most challenging part of this whole project.
There is a bit of a learning curve that comes to stenciling, so my first tiles were not the best. I saved any that were less than ideal though to use as extras or for places where they would not be easily seen.
And remember–it is just paint! So if a stencil comes out poorly, just grab a wet rag, wipe off the paint, and try again.
Step 5:
Peel off backing and apply stencils to the wall, starting at the edge and working towards the corner.
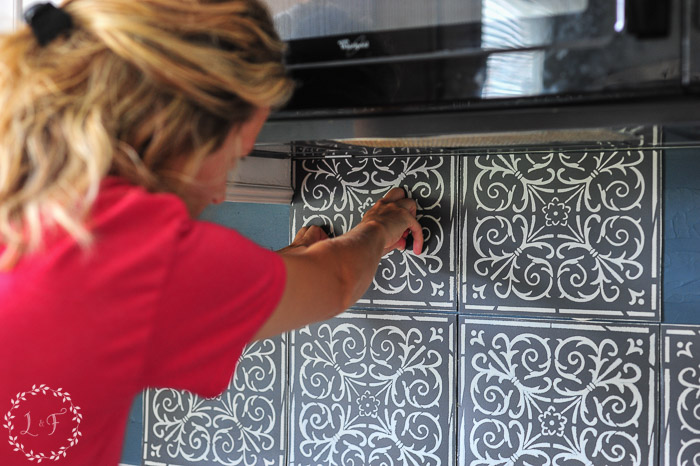

I had done some previous painting work on my backsplash, so the surface was textured instead of smooth.
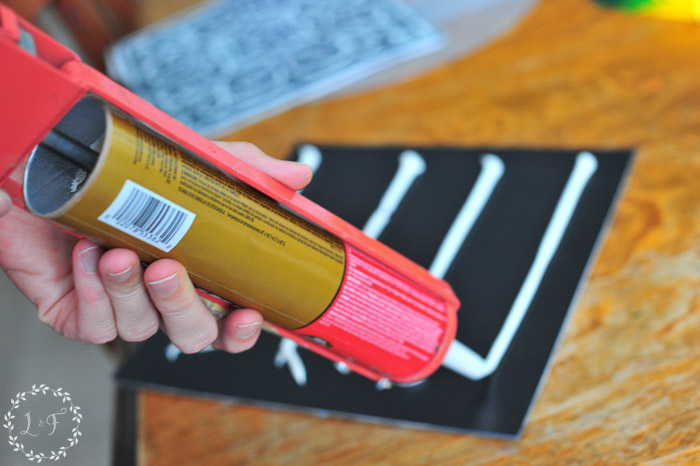
As a result, the adhesive that came on the tiles was not enough to keep them from sliding down the wall, so I added Liquid Nails to the back to each tile to help them stay in place.
You may or may not need this step–best way to know is stick a tile to the wall, come back an hour later, and see if it’s slid down any.
Like the Ultra Grip, I figured better safe than sorry–more adhesion help couldn’t hurt.
A few things to note in this step:
- Decide now if you want to leave room for grout or not (I will give you my opinion on that in a minute). If you do want to grout the tiles, use tile spacers or a coin to help space them evenly when you stick them to the wall
- Some tiles will need to be trimmed to fit around moldings, outlet covers, etc. Hold a piece of paper the size of the tile up on the wall and mark where the cuts should be. That can then be your template for making your cuts on your tile. This is a good place to make use of your less than perfect tiles, as you may only need part of the tile for the space.
Here is an in-process shot of our first wall:
Step 6:
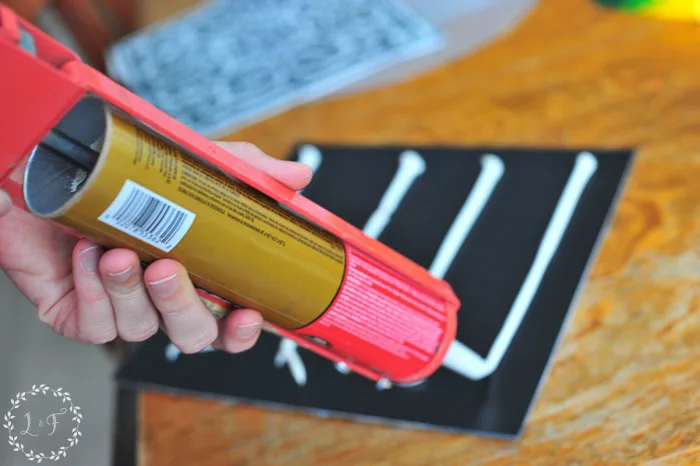
Once a full wall section of tiles is installed, apply 2-3 coats of Fusion’s Tough Coat. Super easy to use, Tough Coat can be wiped on with a rag and will provide an extra layer of protection for your painted tiles.
If you decided not to leave any room for grout, be sure to pay extra attention to where your tiles meet. Tough Coating those seams will keep water, dirt and germs from getting in between your tiles.
Step 7: *optional
After letting the Tough Coated tiles dry and cure for at least 3-4 days, you can wipe on your grout if you choose.
Honestly, if I could go back, I would skip this step and not leave space in my tiles for grout. Grouting was by far the most frustrating part of this project!
Grouting these tiles was not like grouting a smooth porcelain tile. Even though I chose a tile with the least texture available, there was still some texture on the surface and the tiny bits of grout settled into that texture, making it hard to wipe off.
I tried using very little grout, even piping it into the seams through a plastic bag, but it still required smoothing and excess grout wound up all over the tiles.
And what I didn’t think about is that grout is basically like wet sandpaper.
So by wiping off the grout–which again I had to do pretty vigorously because it had settled into the tiny texture of the tile–I was basically sanding my tiles. And just like sanding a regular painted surface, there were places on my tiles where the finish was scratched.
To have the finish on my tiles be scratched at the very end of the process was demoralizing. But, like I said earlier, it’s just paint! And if I really want to, I can go back and touch up the few places if they bother me.
Like most of my paint projects though, it is likely that only I will ever notice the imperfections–they’re not really visible unless you get up close and look for them. But still, if I had it to do over again, I would forego the grout.
So are you ready to see the final photos?
These tiles were a long labor of love . . . And I am so excited to finally get to share them with you!
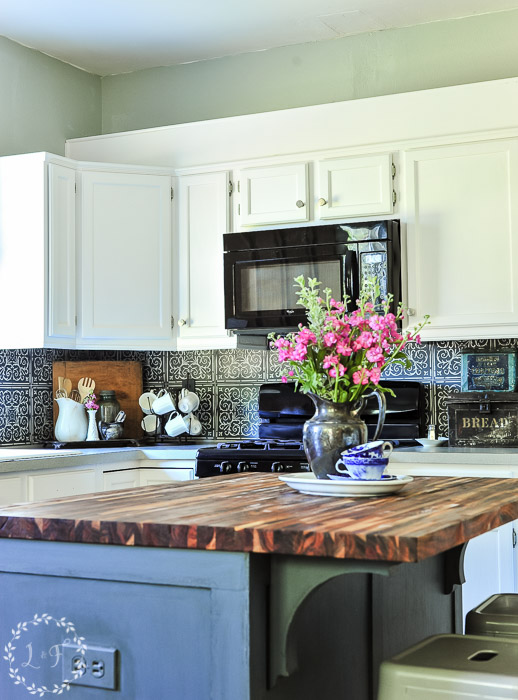


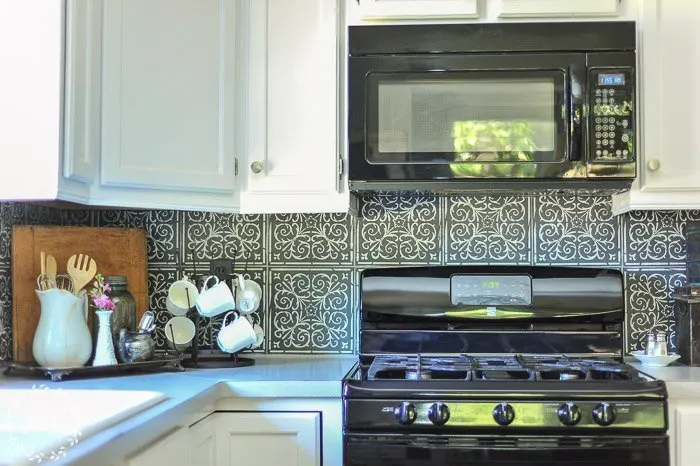
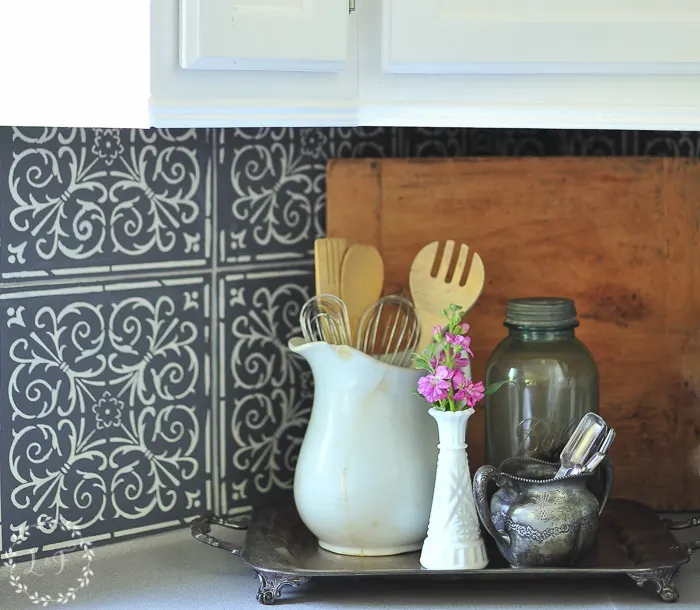
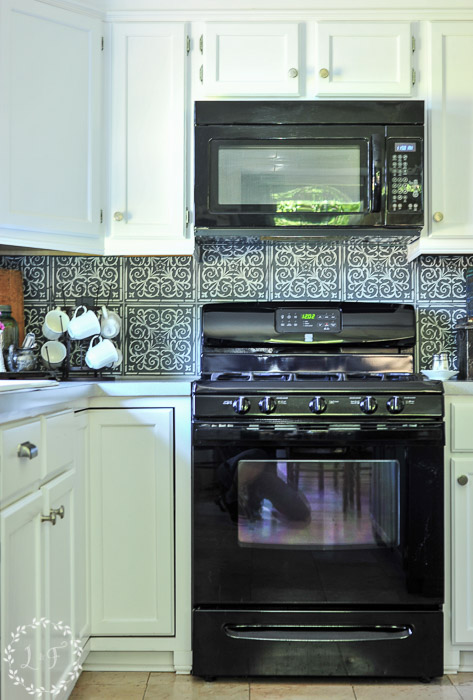
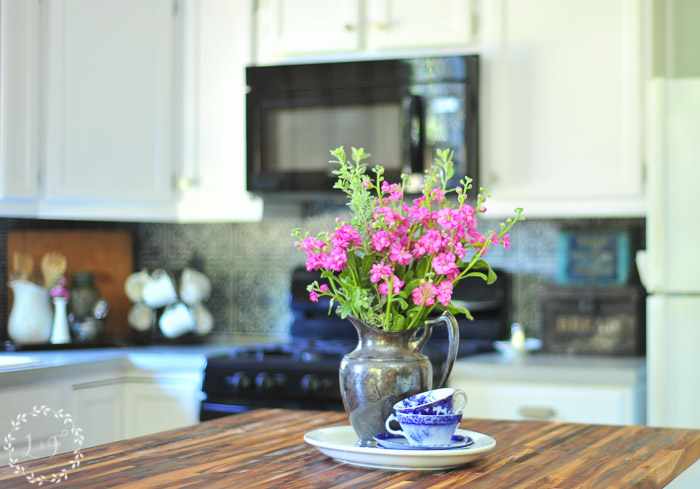
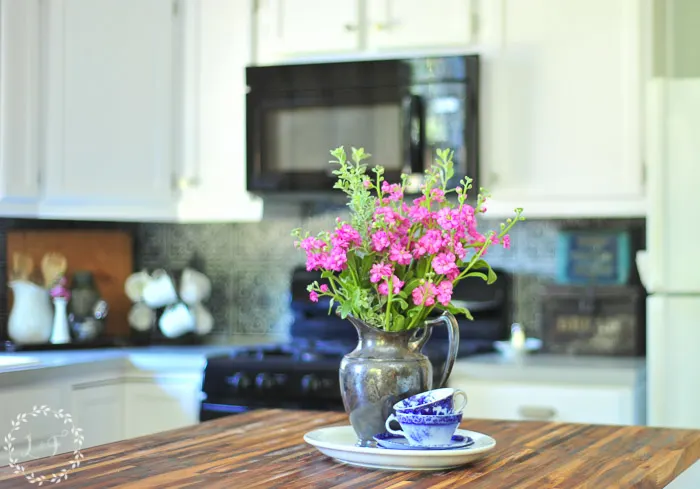
Set off against the white cabinets and light blue walls, these tiles provide the pop of pattern and color my kitchen needed! And since I painted them in the same color as my island, they draw the space together so well.

For us creative types, I think the idea of stenciling your own tiles can be exciting because you can personalize the color scheme to fit your style and taste exactly.


I have had several friends and family in my kitchen since we completed the project, and nobody can believe they are tiles that were stenciled. They really do have a high-end look!
I have one small wall left, to the left side of my sink. There is also a set of cabinets there that will be coming down and replaced with some open-shelving my husband and I built out of leftover cedar fence pickets.
The warm wood shelves will help tie in my butcher block island top and will be visually lighter than the current set of upper cabinets.
And when that project is finished, I will show you that wall too!
So in closing, here are some answers to a few FAQ’s about this project:
Is it safe to use peel and stick tiles and/or Fusion Mineral Paint close to heat, such as the stove?
Yes for both products.
Peel and stick tiles are perfectly fine for use in hot and humid areas, but should be kept away from an open flame.
My stove has a back control panel that shields the tiles from direct flames and also creates 5-6 inches of distance between the heat source and the wall.
If you have a flat cooktop with no back control panel, I would recommend leaving some space in between your tiles and cooktop (roughly 8 inches). You can read more about peel and stick tiles and heat performance here.
Fusion Mineral Paint is rated for high heat use and so is perfectly fine to use for this project. In fact, several Fusion users have used Fusion Mineral Paint to paint over their fireplace tile surround, which is a considerably hotter surface.
Can you clean these tiles?
Yes. Fusion Mineral Paint is an acrylic based paint, and so provides a highly durable, sealed waterproof finish. Adding a few coats of Tough Coat increases that durability even more.
Tiles can easily be cleaned with mild detergent and a rag (like dish soap). I would not recommend a cleaner that has grit to it, like Comet however, as the grit in the cleaner could scratch the painted finish.
What was the total cost for this project?
One box of tile cost $25 at Home Depot and provides 30 square feet of coverage. Two cans of Liquid Nails was less than $4, and the Fusion Pro Grout at Home Depot was $20 (optional cost).
The foam rollers I had on hand, but if purchasing new would be about $5.
The paint I also had on hand, but if purchasing all of the products new, the total comes to $75.
I used less than half of the pint of Soapstone and Ultra Grip, and less than a third of the pint of Champlain and Tough Coat.
So if you have these products left over from another project, you can save on cost. Or, for a smaller area you may only need a tester size of paint ($4.99 versus $19.99) for the stencil color.
The Willowbank stencil was provided to me for no cost by Fusion Mineral Paint to use and review for this post. Purchased new, the stencil is $29.99.
$60 – $160
Depending upon the square footage of your project, if you decide to grout, along with what paint products you already have on hand, the total cost can vary from $159 (f you purchase everything new and full size) to $60 (if you have leftover paint supplies and skip the grout).
Seems like a tough project. Would you do it again?
My main goal in this project was to create a budget-friendly DIY option that would mimic a more expensive, high-end look.
It would have been possible to purchase the actual patterned tiles and tile over the laminate sheet, but if we ever replace our countertops (which I hope one day we do), then all of it would have to be ripped out.
As far as resources go, I have more time than money. I would rather work on a slow, low-cost project a little at a time than spend more money on a project that I may one day have to rip out. If the day comes where I have to rip out these tiles to replace the countertop, I can live with that because I know they cost me very little.
So yes, if the circumstances were the same I would do the project again.
I love the look I was able to achieve and I feel a real sense of accomplishment at knowing that I created something totally unique. And I learned some patience 🙂
There you have it!
Thank you for following along with me on my kitchen makeover journey. I hope you have been inspired to think of creative ways you may be able to get the look you want in your space using non-traditional supplies and without spending a ton of money.
And if you like this project, please help me spread the word by sharing it on your Pinterest boards or on Facebook.


Linking up to: Silver Pennies Sundays, Wow Us Wednesdays
15 Best DIY Backsplash Ideas for Bathrooms & Kitchens
Tuesday 25th of July 2023
[…] Lost and Found […]
The Best Ways to Style Cutting Boards in the Kitchen
Friday 17th of March 2023
[…] I love a good decorative prep station on the kitchen counter. Even more so when it’s aesthetically pleasing like Melanie’s from Lost and Found Decor. […]
Jackie
Friday 13th of January 2023
This stenciled backsplash turned out so good! I might have to try this technique out! We are having our kitchen cabinets refinished next week so maybe once that is done! Thanks so much for sharing!
Awesome Developer
Saturday 14th of January 2023
Thank you Jackie! Good luck with your project, I'm sure you're gonna love the end result :)
Karen Ploransky
Wednesday 16th of November 2016
I can't believe you did this. It's gorgeous. I have been looking for a stencil and I was going to paint the dark cherry flooring (yes they put flooring on the backsplash) and stencil a similar pattern in white and gray! I loved the Fixer Upper kitchen tiles as well! I never thought of using floor tiles, which is a much better option! Thank you for taking an idea that's been frustrating me and making it super simple (no grout!!)