DIY Project to Update Your Fireplace with Paint
Do you have an old fireplace in your living room that makes you sad to look at? I can relate!
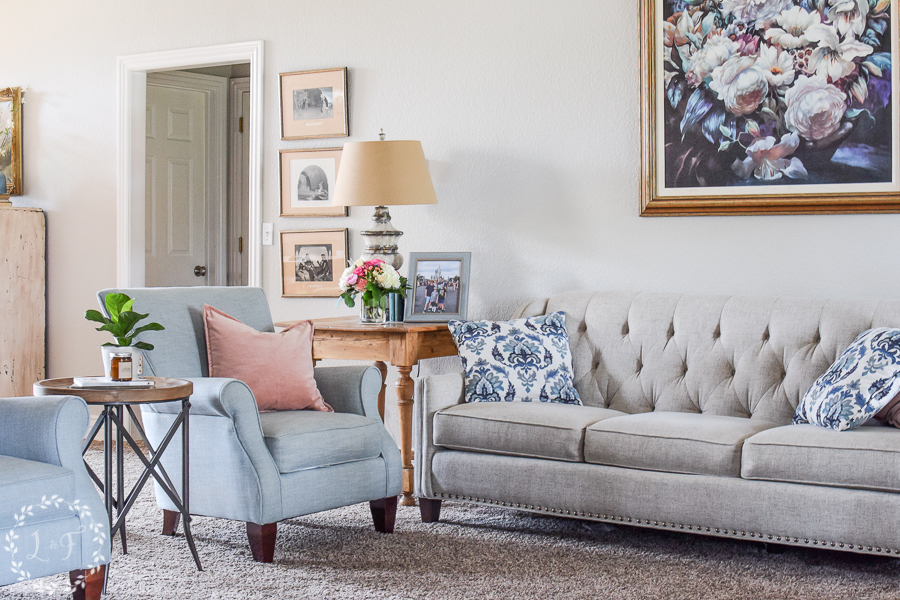
After we moved to our new home, I slowly started making easy updates, working my way through all the rooms. Our main living spaces were my first big focus, so our living room got its makeover pretty early on.
You may remember that it started out looking like this.
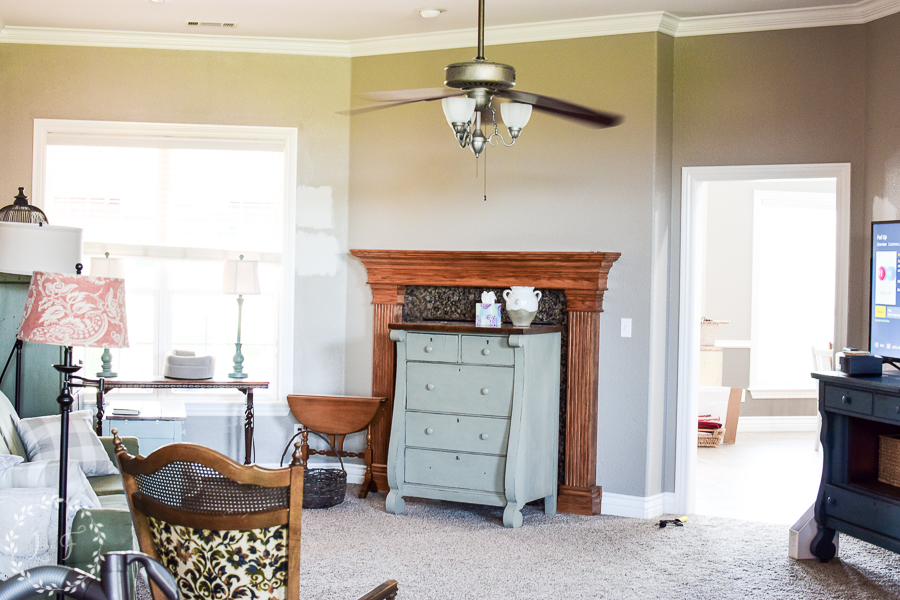
I know . . . yikes! For what it’s worth, this photo was taken about 2 week after we moved in, so there was random furniture all throughout the room.
You may remember when I shared how our living room makeover was coming along. We all agreed it was much better!

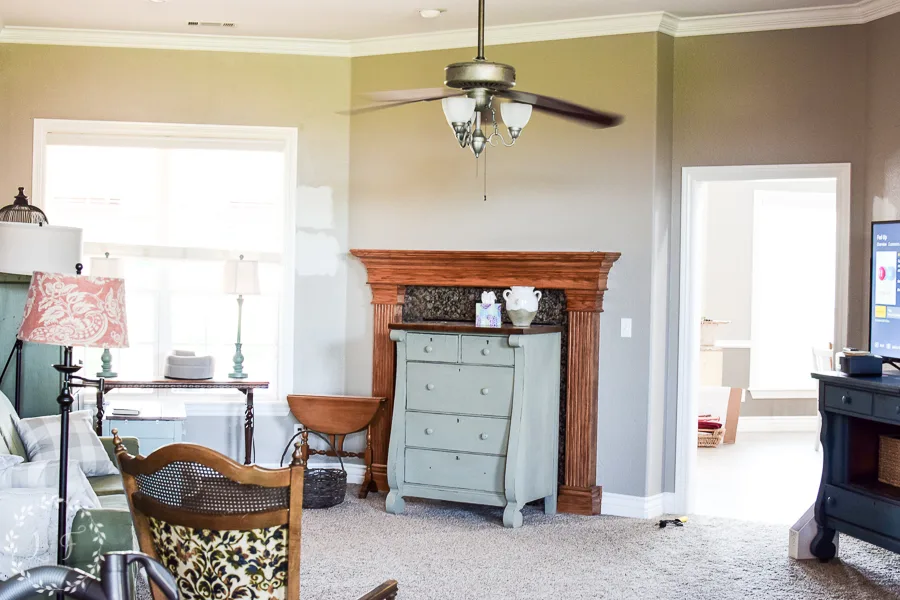
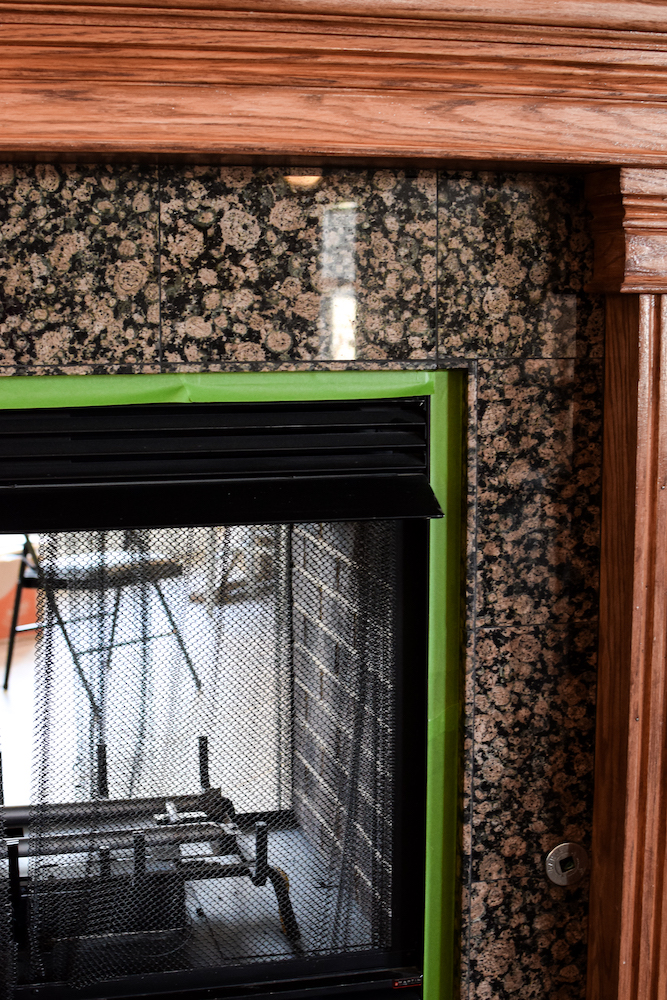
But in that post, I still wasn’t ready to show off the other half of the space where the outdated fireplace sat staring at me, because it still looked like this:

How do I update my fireplace in 2024?
The orange-wood mantel and black-flecked granite tile surround of the original fireplace just wasn’t fitting with my tan, blue, and blush color scheme. It was time for a whole new look.
So, making over this fireplace was my next big project. I decided that rather than replacing the entire thing, some DIY projects would be a great way to get the look I wanted.
I knew a bit of paint would take care of the wood mantel, but the granite tile on the sides of the fireplace was a bit trickier to deal with.
I decided that instead of trying to chisel it out and install new natural stone tile or fireplace brick, I would just paint it too! It was a bit of a gamble, but I figured if it didn’t go well, I would be back in the same place I started.
So, why not give it a go?
That’s one thing I’ve learned about DIY decorating over the years– sometimes you just have to step out and try something new, and remember that the consequences are really no more serious than just trying again.
The cost, sweat, and tears that would be cried over installing new tile or brick surround would be so much more than some trial and error painting.
And in the end, I love the fresh new look that is the end result!
I think you will too. Paint made such a huge difference in this fireplace update, and I think it was one of the best fireplace remodel ideas I could have tried.
So I’m going to spend the rest of this post walking you through how to achieve an updated look for your own fireplace with paint, in case you want to try this budget-friendly way to upgrade your space yourself.
This post contains links to websites outside of LostandFoundDecor.com. These links are provided for your shopping convenience. It does not cost you any more to purchase products through these links, but we do earn a small commission when you do and it helps to support our blog. Thanks for the love!
DIY Fireplace Makeover Materials:
- Fusion’s TSP Alternative Cleaner
- Primer
- Paint roller
- Sanding Pads
- Frog Tape
- Tile-patterned stencil (go ahead and get at least 2 of these, trust me!)
- Fusion Ultra Grip (if needed)
- Fusion Mineral Paint Algonquin, Chateau, and Soapstone
Step 1: Clean, Tape, Sand
When giving anything a coat of fresh paint, the first step is to clean your surface well. This will go a long way to preventing the heartbreak of paint not sticking and your project not working the first time around.
Save yourself some time and a lot of money in materials by doing this first step!
I gave the whole surface a wipe-down with Fusion’s TSP. After it was dry, I scuff-sanded the wood mantel lightly.
You want to do this just enough to open up the pores of the finish so that the primer will sink in.
After I wiped off all the sanding dust, I taped off the metal fireplace parts to avoid getting paint on them.
Frog Tape is my go-to painter’s tape. It does the best job of sealing the tape line so the paint doesn’t seep underneath.

Step 2: Prime the Fireplace Mantle and Tile
Because the wood mantel had a pretty glossy finish and also because it was such a potent orange color, I decided to add a base coat of primer.
Primer isn’t always needed under Fusion Mineral Paint, but I figured I had some, and it certainly wouldn’t hurt to use it.
I knew I needed to prime the tile–that granite is super slick, and I wanted to ensure the paint would adhere to it.
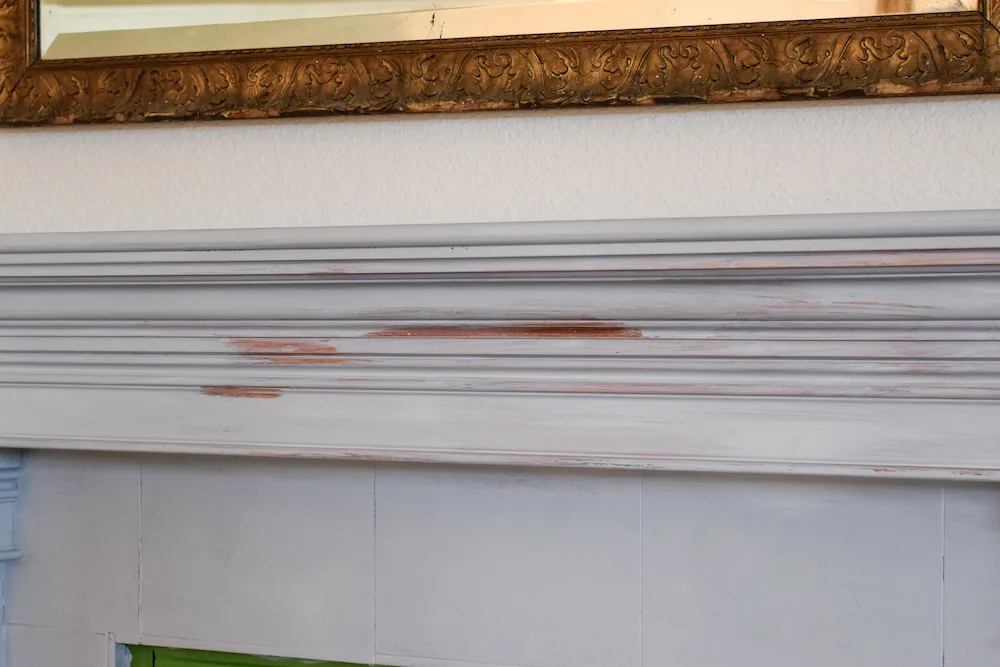
It was a good thing I decided to prime the wood mantel because after one coat, this happened:
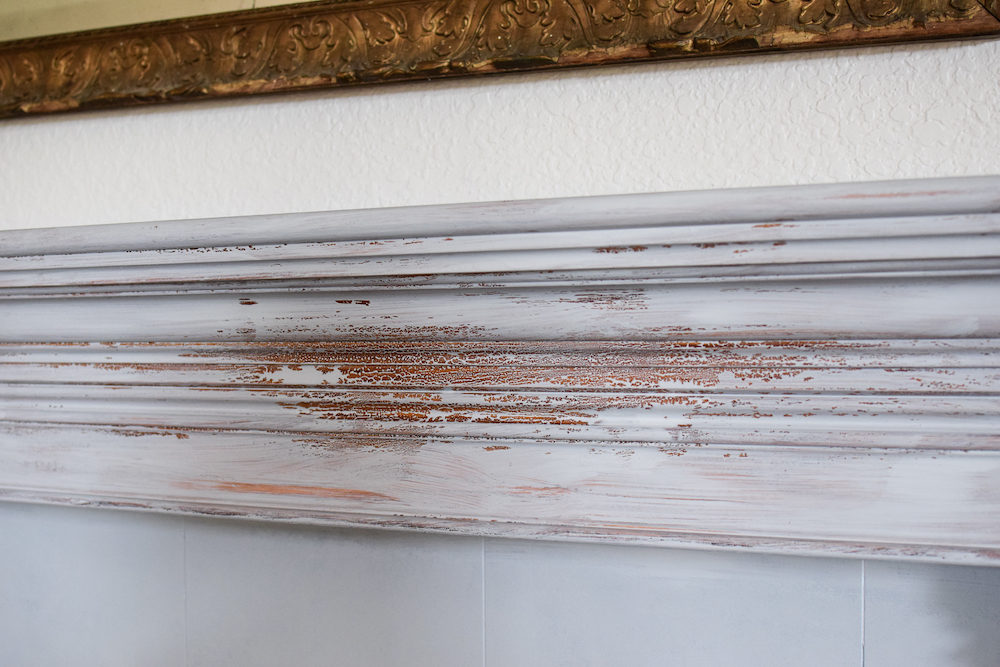
That my friends, is not good!
Why is the paint not sticking to the tile?
When your paint “laces up” like that, it means there’s something really icky on the surface that is resisting your paint. I did clean this first and I was also working with adhesion primer, so I was surprised to see the primer not adhering!
My best guess is this: the fireplace is gas, and this spot was at the dead center of the mantel.
When the fireplace had been run in the past, the gas-produced fire must have given off a chemical that built up on this section of the mantel as the heat rose. It looked and felt clean, but something had sunk into the wood and it just did not want to be painted.
So here is a paint lesson for you–sometimes weird things happen.
99% of the time paint products work exactly as they are supposed to, but on rare occasions, they don’t. And it’s not the paint’s (or, in this case, primer’s) fault! It just means there was a condition on the surface I was not aware of. So if this ever happens to you, don’t panic! Just step back and take a minute to problem-solve.
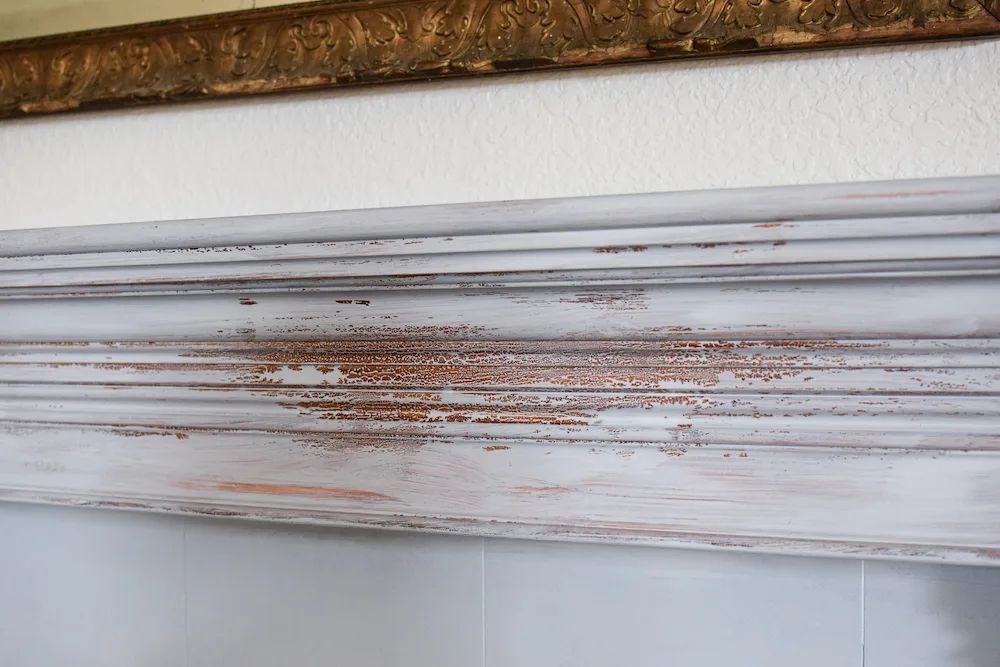
I decided that to fix this spot, I would sand off the “laced up” primer and try applying some Fusion Ultra Grip. It is hard, pure acrylic and sticks to just about anything.
I hoped it could defeat whatever was on this section of the mantel.
I painted a light coat of Ultra Grip on the spots where the primer wasn’t sticking and let it sit overnight as per the instructions.
The next day, I tried painting on another coat of primer over the Ultra Gripped spots. And here’s what I got:
Better, but there were still a few spots where the primer didn’t want to stick.
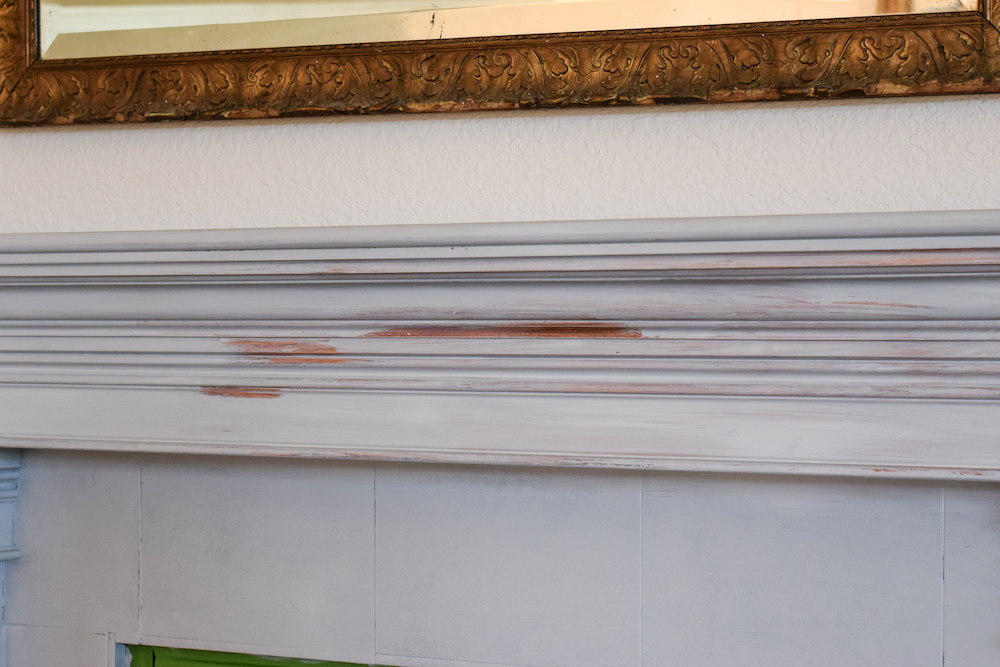
So I repeated the same process with another coat of Ultra Grip, and the third time was the charm. The whole mantel was now primed, and there were no more adhesion issues in that spot–whew!
While working on the never-ending mantel priming, I also rolled on two coats of primer over the granite tile, waiting a day between each coat.
After the first 2-3 days, I could still scrape the primer off if I tried hard enough. But after about 7-8 days, it had cured up well, and it wouldn’t scrape off anymore–success!
Step 3: Paint Base Color of Tile Pattern
With everything primed, I was now ready for paint. I decided to start with the tile first because I knew the process of stenciling along the edges would get kinda messy, and I didn’t want to worry about messing up the mantel paint.
It would be easier down the road to tape off the stenciled tile when it was time to paint the mantel.
What kind of paint do you use to paint a fireplace?
I used Fusion Mineral Paint for this project, in colors that spoke to me for this particular occasion.
For the base color I chose Chateau. I didn’t want a pure white because it would be too harsh a contrast with my not-white walls.
Chateau still “reads” white, but it also has enough gray in it that it plays well with my gray-beige wall color (SW Agreeable Gray, if you’re wondering).
I rolled on two coats with my microfiber roller, waiting 3-4 hours in between each coat. I painted right over the grout and all, creating a nice blank slate.
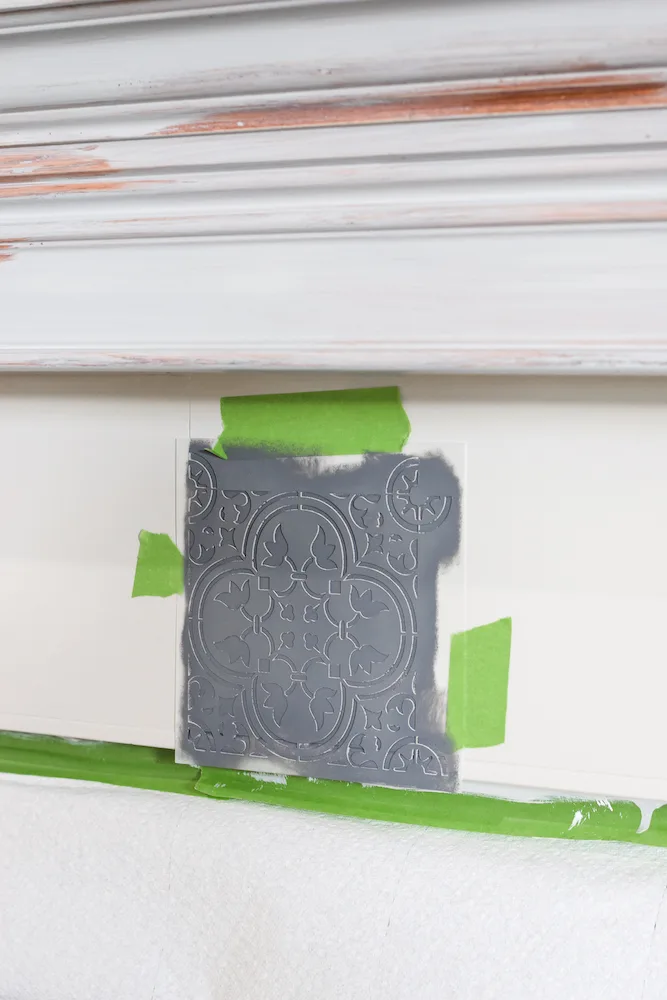
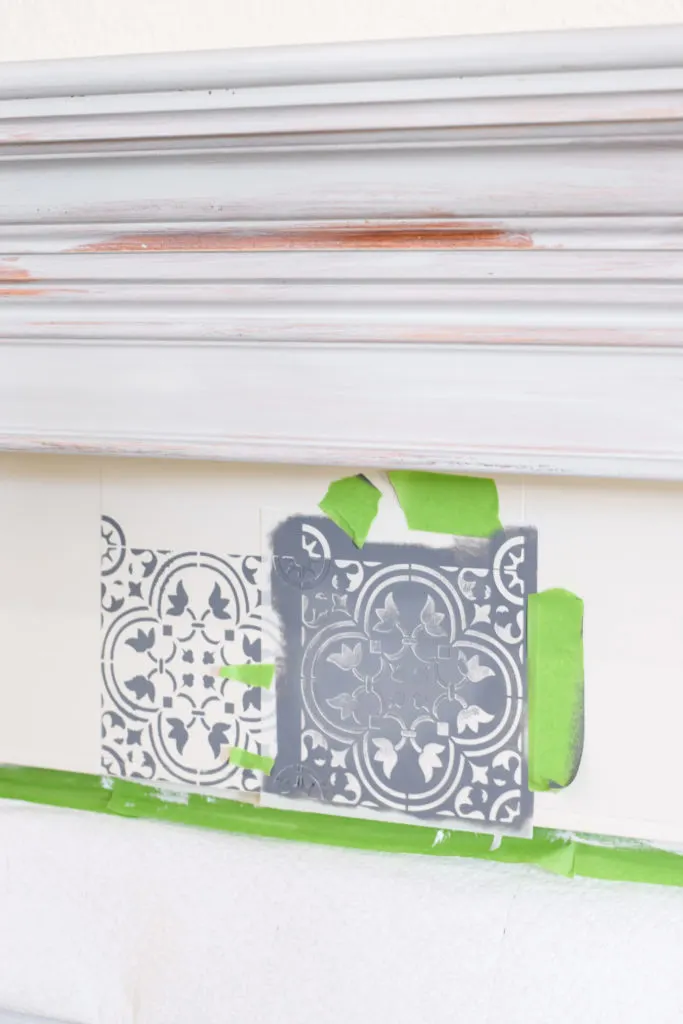
Step 4: Stencil Tile Pattern
Now, the fun part starts! I wanted the feel of patterned tile for a more modern look, so I bought this stencil from Amazon.
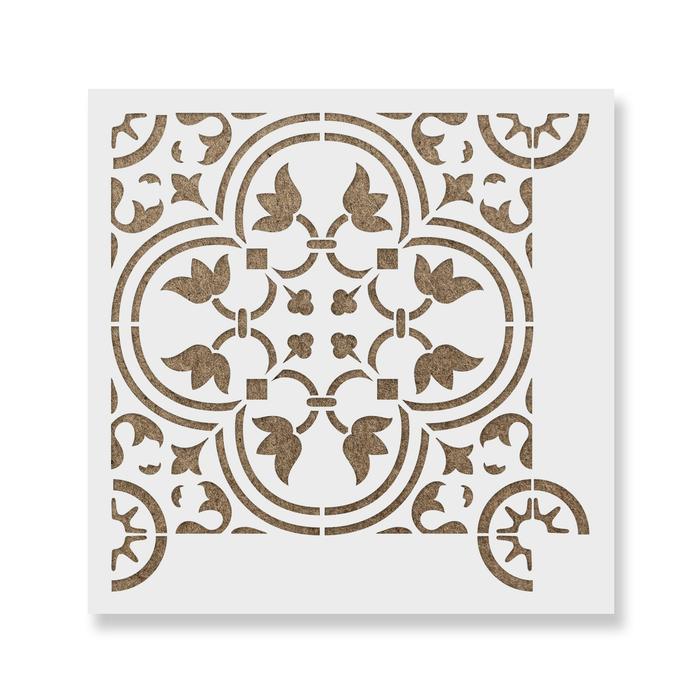
My granite tiles were 12″ square, so I chose the 6″ x 6″ tile stencil. This meant I could fit exactly two stenciled patterns into one of my granite tiles.
My goal was to line up with the existing grout lines as much as possible, but if I was off a little bit, it wouldn’t matter too much since I painted the grout white also.
If you are doing a large stencil project like this, buy at least two stencils! Having multiple to use makes the project go so much quicker, and once you get to the end where you are trimming them to fit weird spots, you will be glad to have some extra.
I decided to stencil all the full pattern spots first, then work on the spaces where I would need to trim the stencil later.
So, I lined up the stencil right in the top middle of my surround and used that as my starting point. For the color of the pattern, I chose Soapstone, a dark bluish gray.
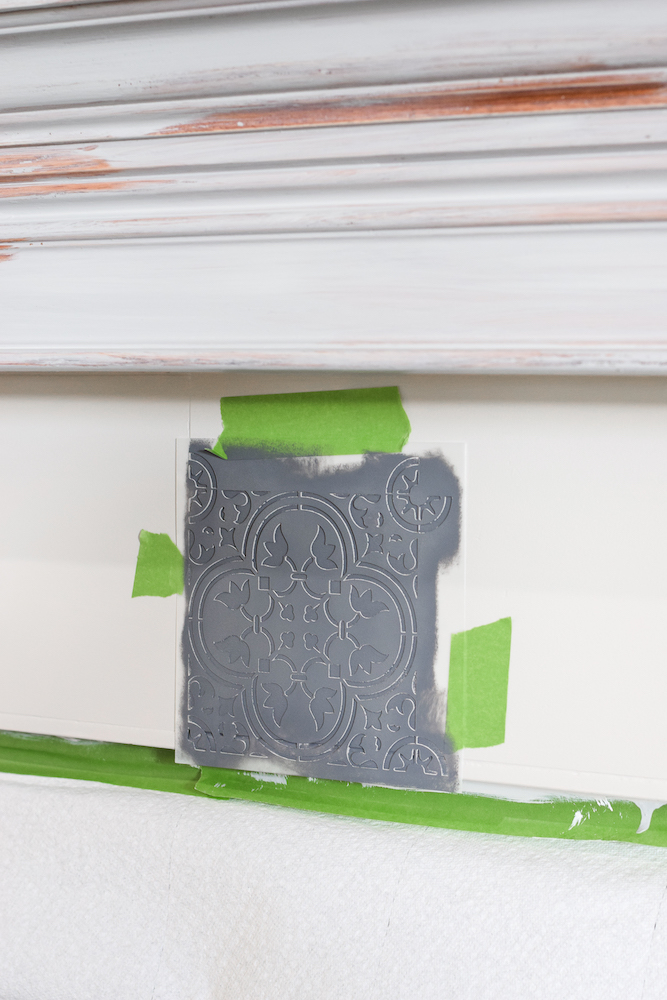
Patience is key when you are stenciling.
You do not want to rush it and try to stencil on too much paint at once, or it will bleed under the stencil and set back your entire project while you fix it.
So work slowly, either rolling or pouncing on a few light coats of paint.
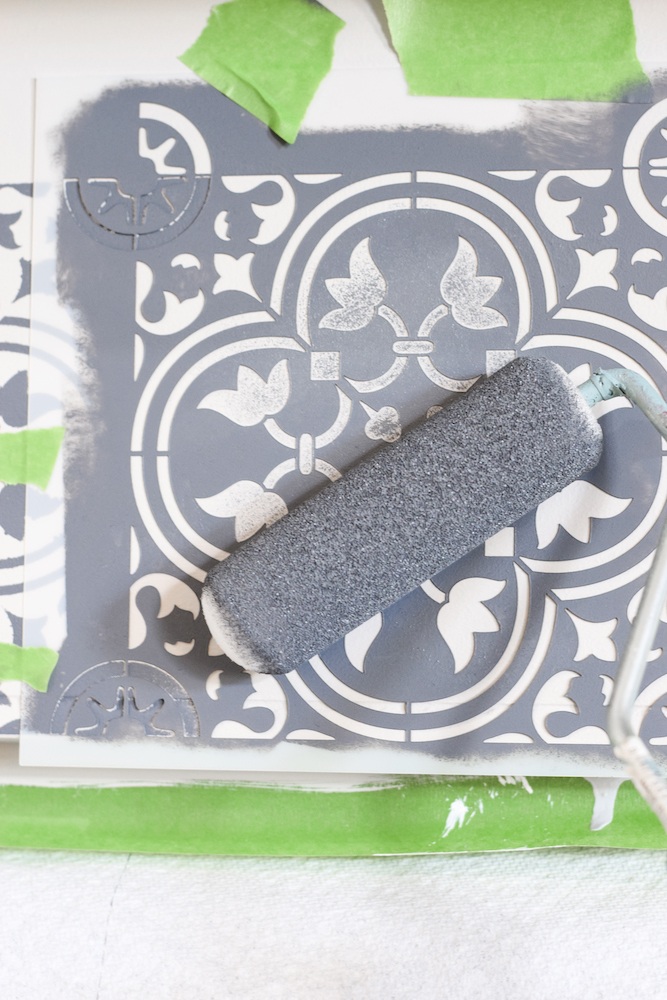
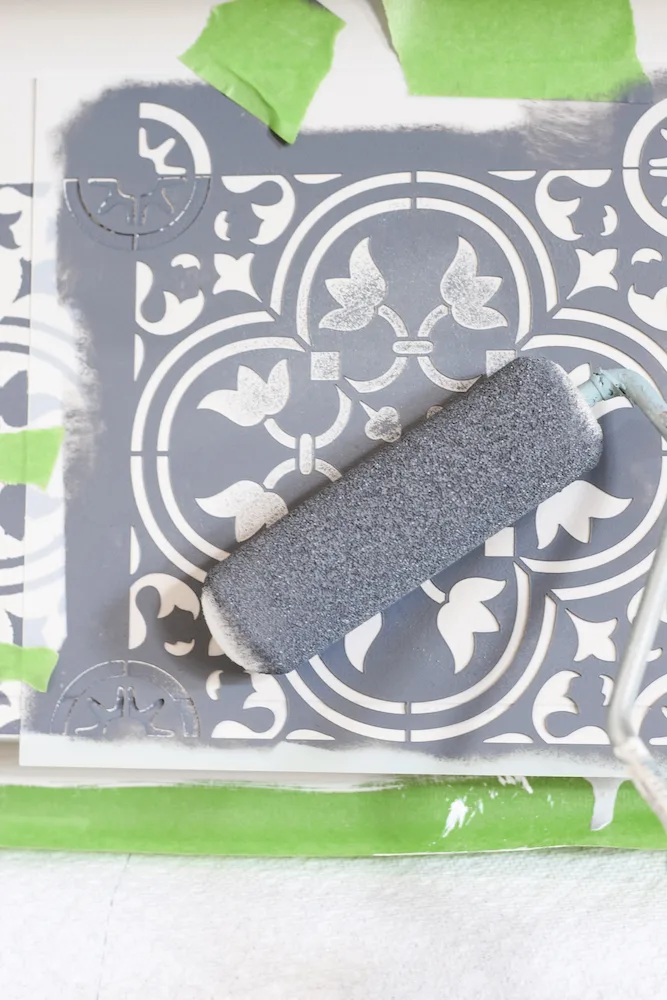
After I finished each section, I untaped the stencil and moved it to the next spot, making sure to line it up as best I could.
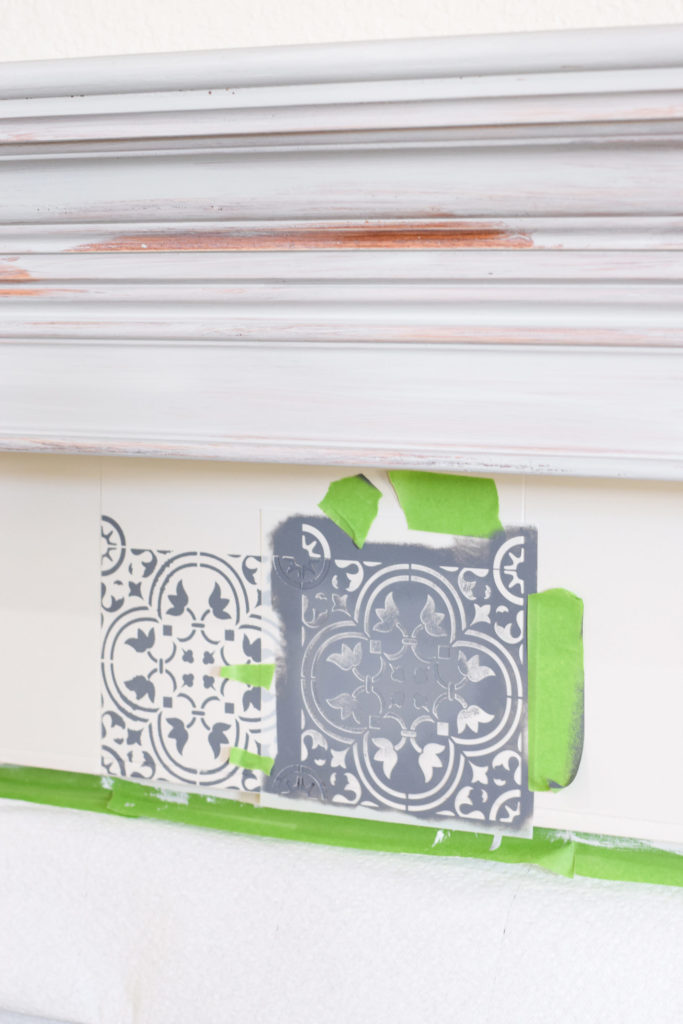
Eventually, I stenciled all of the full pattern spots, and only the weird trimmed spots were left.
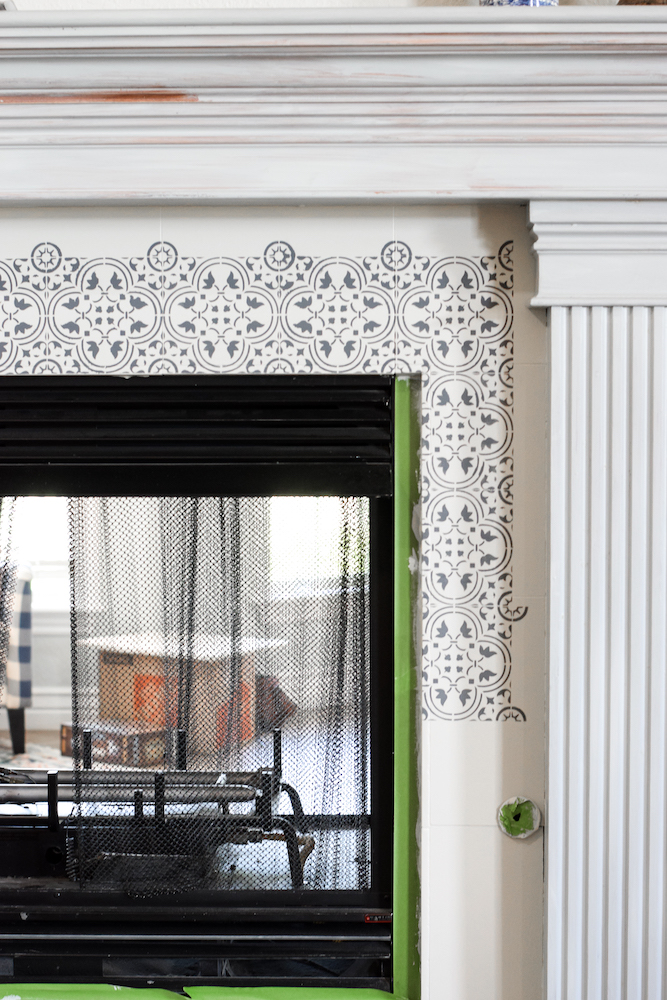

I’ll be honest and tell you that at this point things slowed down a bit!
The process of trimming the stencils to fit the smaller areas was a bit time-consuming. But I just worked at it a little each day, starting with the largest sections and working my way to the smallest.
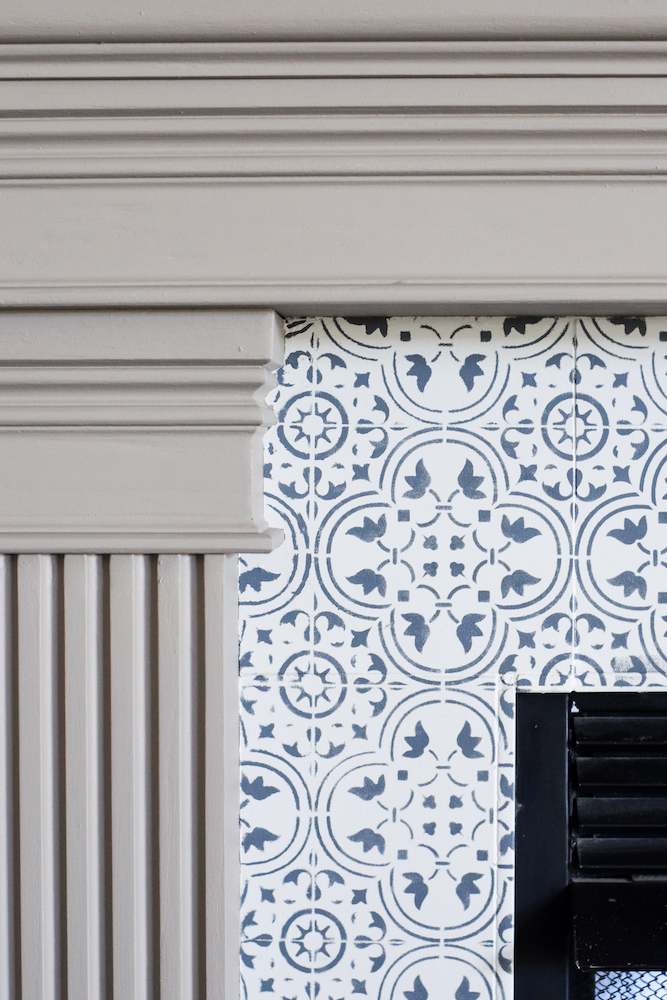
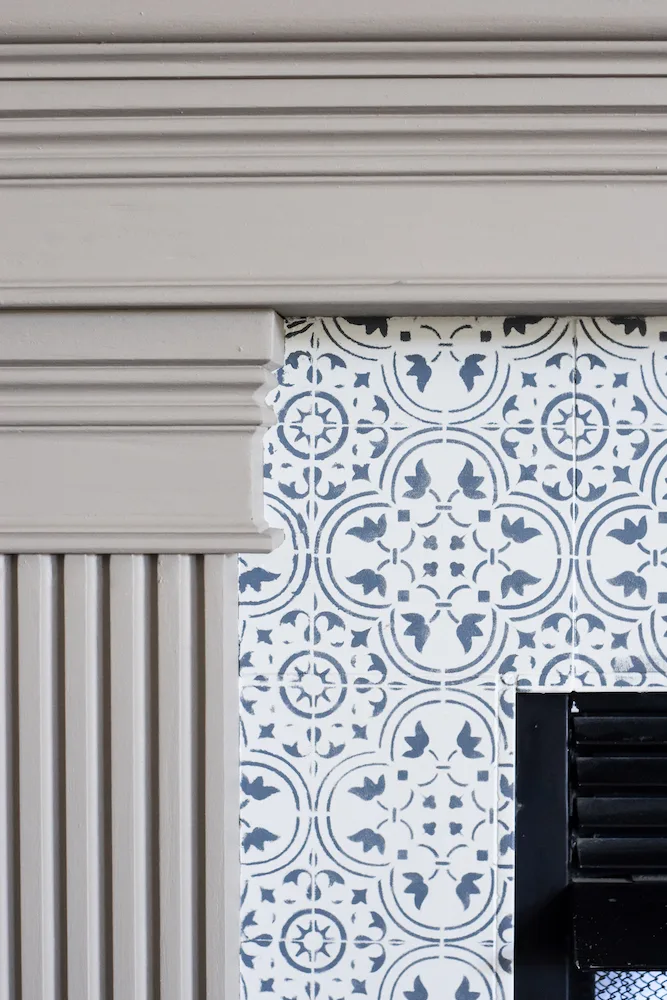
This is what I was left with, when it was all said and done.
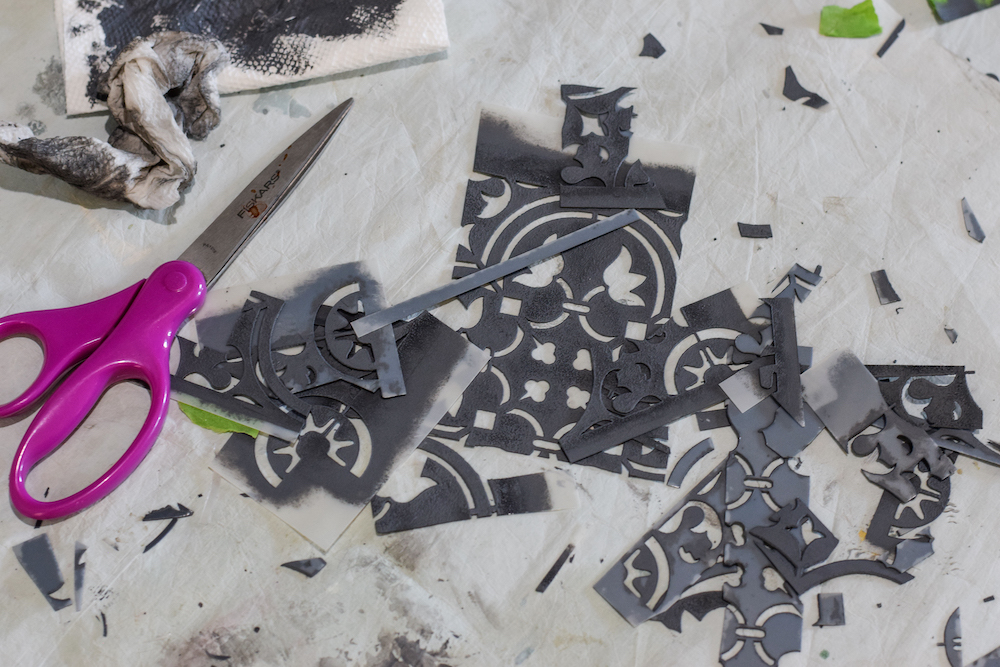

See again why it’s handy to have more than one stencil? It just gives you more to work with when you’re trimming them to fit the tiny or irregular spaces.
Step 5: Paint the Wood Mantel Surround
I let the painted tile cure for about a week; then, I taped it off so I could paint the actual mantel.
I was going for a neutral color but still wanted it to stand out a bit. I chose Fusion’s Algonquin as a darker neutral; two coats provided perfect coverage.
Remember, Fusion does give you a matte finish, so if you decide you want to add more sheen you can do that with a bit of the Tough Coat.
I was happy with it the way it was and ready to wrap this project up though, so I left the Algonquin as it was.
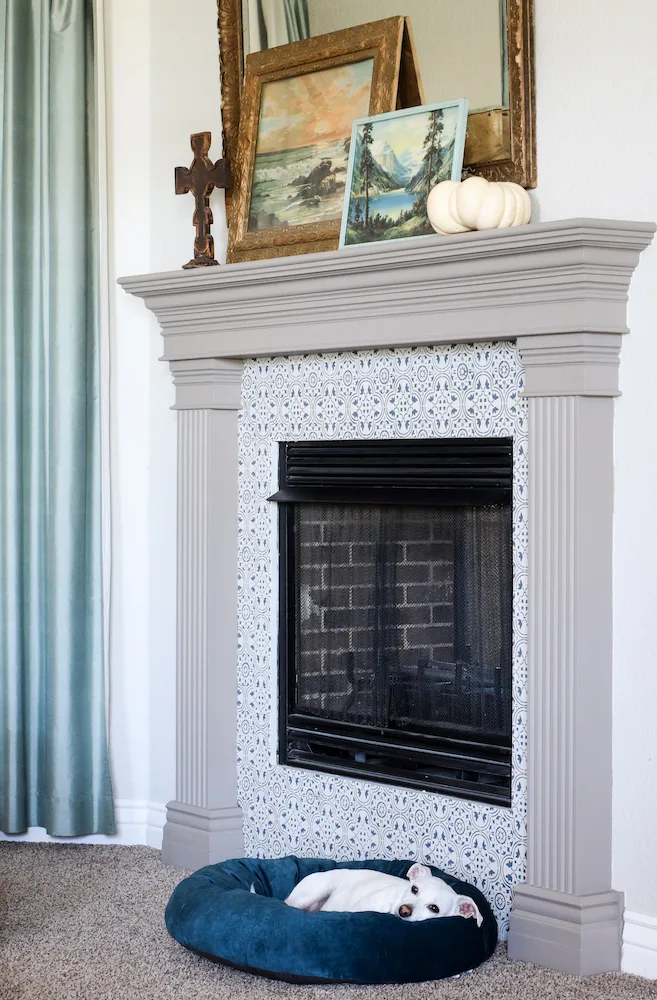
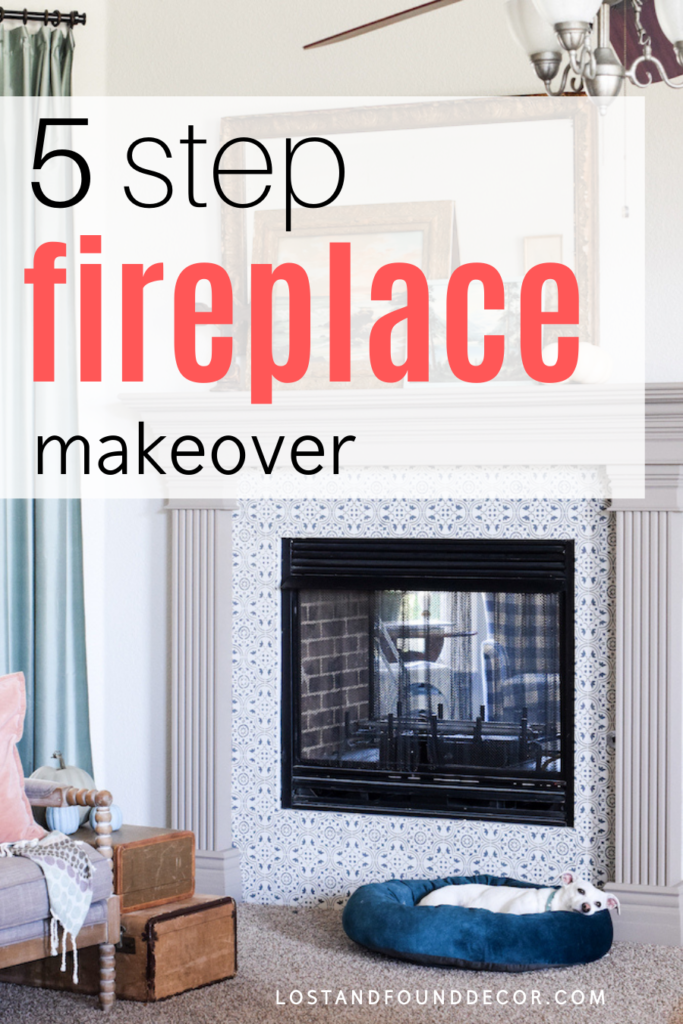
DIY Fireplace Update After Photos
Ready to see it all finished?

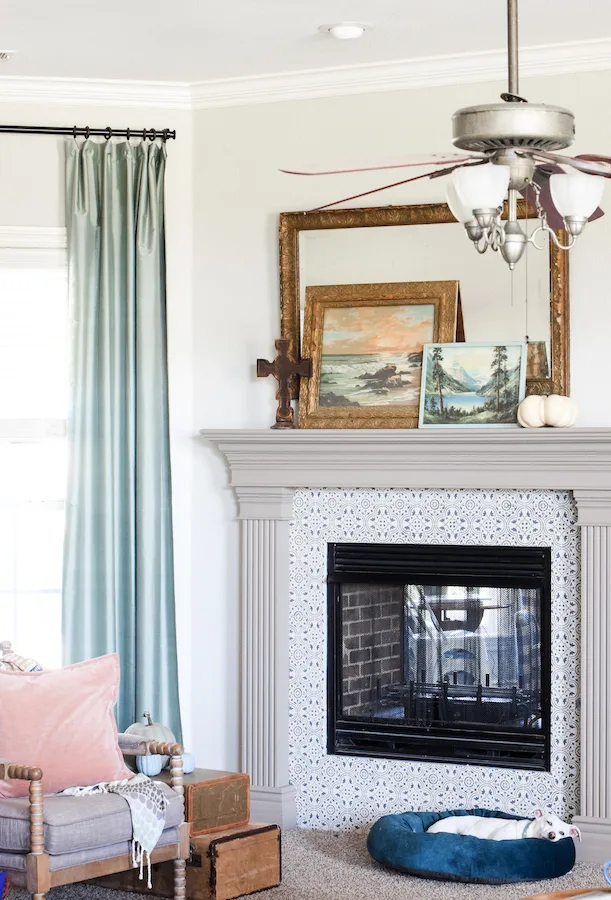
Quite a difference, don’t you think? Scroll back up to look at it before, just for fun 🙂

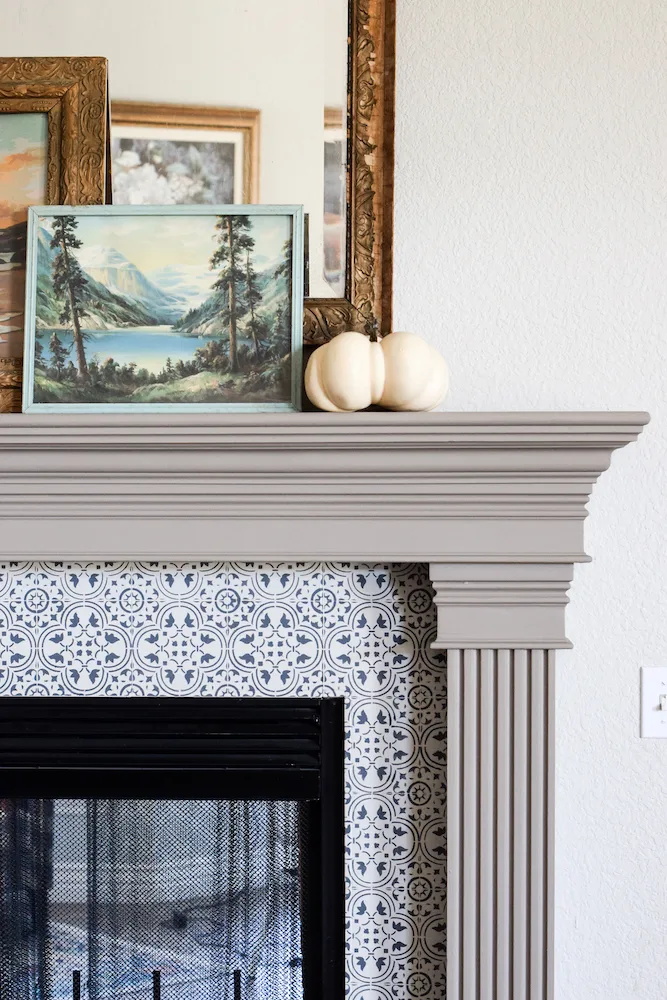
I love the new contemporary look I was able to give my space, and it took nothing more than a big impact paint job!
Even though I wouldn’t call this an instant update fix, the whole project was worth all the time it took.
I love the new look and think it perfectly complements the rest of our living room. This mantel and fire surround look brand new with some nice new accessories.
The stenciling isn’t 100% perfect–there are a few spots that are kinda messy here and there, if you look closely enough.
But I think that adds a little character since real tiles probably wouldn’t be completely uniform either.

Would you like to try Fusion Mineral Paint for your next furniture project?
They have generously offered my readers a 10% discount on all Fusion products when you click and purchase here.
The discount will automatically be applied in your cart. Yay!
My sweet little dog was just too comfy in his bed, I felt bad for making him move! So I decided he could hop into the after photos.
Overall, this look compliments my style so much more and really brightens up that whole side of the room. Now when I share living room photos I can show the whole space!
Is painting tile durable?
Well, the paint is adhering to the tile and mantle perfectly! I can’t scratch it off either surface, and we have now gone through Christmas with decorations all on the mantle, and it still looks great.
Do you need heat-resistant paint to paint a fireplace?
So, that’s a bit of a tougher question. There are very few paints that are truly rated for high heat, and usually they only come in a few colors.
The truth is that if you are only painting the outside of your fireplace, you don’t typically need them. Paint used in this context needs to be able to withstand heat of 200 degrees Fahrenheit.
This is true for almost all interior paints, including the Fusion paint I used.
Since we finished this project, we have run the fireplace many times and have had no issues at all with the Fusion paint on the tiles. There has been no peeling or browning, nothing that would indicate a problem.
Of course, it’s always a good idea to test your methods first if possible. For me, painting was the easiest first step to try.
Pin this Resource!

What do you think–would you ever give a project like this a try? This is my second major stenciling project (my first was stenciling a tile kitchen backsplash, you can see that here), and I’m really happy with how they both turned out.
Using paint rather than ripping out the tile saved me money and helped me keep my sanity. I really do love painting, and this was a fun new way to use some of my favorite products.
Thanks for joining me today, I hope you feel inspired to go try and DIY an area of your own home! If you have any other DIY fireplace ideas, I would love to hear them! Leave them and a before and after pic in the comments 🙂


Linking up to : Fabulous Finds
Angie
Sunday 26th of October 2025
Thank you so much- my dark quartz fireplace has been a nightmare due to the dark color- am going to paint it using the paint and steps you recommend.
Anna
Monday 8th of January 2024
Holy smokes! What a transformation! I love how the stenciled design looks and the colors you selected are perfect. Thanks for the additional info on the tactics you used to finally get the primer and paint to adhere to the mantel. Very helpful!
Lizzy
Thursday 14th of December 2023
Wow! What a fantastic makeover! I really like it. SO much better!
Vicky
Thursday 14th of December 2023
Nice job. So fresh and updated.
Home Imagined Link Party #21 - The Antiqued Journey
Friday 17th of November 2023
[…] How To Update Your Fireplace with Paint Easy Ways to Boost Your Curb […]